Saturday, February 28, 2015

The Maze Runner Nail Art

Another month is wrapping up over in our book club group, The Polished Bookworms. February was "Young Adult", and The Maze Runner is the book that was voted on by the group.

My manicure is inspired by the beetleblades (on the middle finger), the ivy and leaves growing all over the maze walls, and the plaques hidden amongst the ivy. Bare with the awkward hand poses for today! 


Products Used
OPI Push and Shove (middle finger)
Deborah Lippmann Jessa (writing)
Wet n' Wild Black Creme (script)
Nicole by OPI Always a Silver Lining (index base)
China Glaze Be More Pacific
China Glaze I'm With the Lifeguard
Deborah Lippmann Hannah
China Glaze Fast Forward
MoYou London Pro 04
Dotting Tool amazon
Brushes eBay (trimmed)


This was my first time painting words, I trimmed the brush right down and it was better than I thought. Still not amazing, but it's a start! Push and Shove was perfect to symbolize the beetle blades in the Glade. I dry marbled together the green shades to create the overgrown ivy effect and also frame the "plaque" on the index finger. I used a ton of products, and a ton of techniques in this manicure, but it turned out pretty much exactly as I envisioned, and I'm happy with it! 


Do you enjoy reading young adult books?

xo Shawna


Tuesday, February 24, 2015

Chevrons & A Review

Press samples

 Good evening! (I feel like a newscaster. Except I do have good news). I did some fresh, simple nail art tonight and finally got around to testing and reviewing my final item sent to me courtesy of born pretty store! This was the item I was most excited to receive, the floral handled liner brushes


Products Used
OPI French Quartier For Your Thoughts 
Zoya Yuna
Color Club Kismet
China Glaze Fast Forward


This mani was great because 3 of the 4 products were untrieds, and my goal is to work through all of my untrieds by the end of March!


I started with a layer of French Quartier which is a pale grey. I was glad it didn't seem to wash me out as some greys can. Then I painted on a chevron half-moon using Yuna, and the brush right from the bottle. 


Lastly I painted on the holo stripe with the short thin brush. The brushes are stiff when you remove them from the package, but rubbing the bristles between your fingers soften them right up. I was really impressed how soft the bristles are! Once I'm done using them, I clean off the polish with some acetone and then wash with soap and water. I find this keeps the bristles from hardening. I've also heard some girls using a bit of mineral oil when the bristles start to splay after a couple of uses- I have yet to try this myself! 


I wouldn't hesitate to recommend these brushes. Don't forget you can save 10% off regular priced items with my code SDPX31 and shipping is free!

xo Shawna

*post contains affiliate link

Sunday, February 22, 2015

Pink on Pink Chevrons

So, I swear my life has been taken over by my wedding planning the last few weeks. (Well, actually the last few MONTHS but we are currently in the process of booking our room block, which means invites are being mailed out soon, which means I need to make the invites since I'm going the DIY route!) The designing process on photoshop literally took hours of resizing, test printing and cutting, overanalyzing which fonts looked the best (let me tell you- that website 1001fonts.com is WAY too many fonts, haha!). Long story short. They are not done yet but the designing is - so now it's the manual labour left, and I took a much needed break to do something more exciting to my nails than I have been over the last week! 


Products Used
OPI Passion
OPI Manicurist of Seville
MoYou London Fashionista 05
Cheeky Gemstones
China Glaze Fast Forward


I ordered this chevron plate at Christmas, and still haven't unwrapped the blue plastic until today! I actually wanted to do a gradient stamp but it wasn't working the the other polish I chose so I decided to save that for another day. (side note- i just can NOT get MDU to work for me, so I'm destashing them). Passion is a very sheer soft pink, but I think it looks really sophisticated as a base for the bolder stamping colour. I received Passion and the cheeky gems in my canuck swap package. I'm in LOVE with those gems, there are so many great shapes in the wheel!


Are you a DIY kinda gal (or guy) or do you like other people to do the legwork for you?

xo Shawna

Friday, February 20, 2015

Super Satin Top Coat Swatches

press sample

I am so excited to share my first official swatcher post. (Yes, I have swatched before and also tested items for review. But this is the first time I have been sent a POLISH to review/ swatch! Well, top coat. Close enough ;) )

Bree at @breezylovesnails selected me to swatch her new top coat (for her brand new label, Mad Scientist) Super Satin Top Coat. It's a semi-matte finish, so while it takes away that glaring super shine of normal top coats, it doesn't completely dull the finish as a matte TC would. 


The ring finger is coated with China Glaze Fast Forward, with the other fingers Satined up for comparison. At first glance, I will be 100% honest, I could see some element of satin finish but it wasn't quite what I expected. I figured out that the longer I waited (beyond the 10-15 minutes I waited to shoot pics after swatching), the better the satin finish looked! So, for reference, the pink and grey swatches were done with a shorter dry time, and the holo polish had a few hours before being photographed. That is where you can really see the difference!! 


I did a simple dotticure using Fast Forward over Satin (over CG Sexy Silhouette). 


THIS is where the satin truly shows! Check out that picture below. I used the satin TC over Daily Hues Nail Lacquer Blaze (can you tell I've been obsessed with DHNL lately?) and did shiny chevrons using Up Your Nail vinyls & Fast Forward TC. 


Huge props to the formula being easy to work with, and the brush is great- not too skinny.


Lastly I have it over CG Tip Your Hat. 


I fully admit the first shot doesn't show it at it's greatest. Ring finger is glossy for comparison. Below, I've french tipped using Fast Forward. 


Super Satin Top Coat is launching soon, so keep your eyes on her instagram for the launch! Thanks for being my first, Bree! 

xo Shawna


Tuesday, February 17, 2015

Born Pretty Store Reviews

(press samples)

I was kindly sent a few products from Born Pretty Store to review! I had actually selected a few different items originally, but sadly the first package went missing in the post. Alice was nice enough to let me select new items, and luckily the second package made it to Canada without a hitch! There were so many great items to choose from, and I had a tough time narrowing it down - but here is what I settled on! (Don't forget if you use my coupon code SDXP31, you will save 10% on regularly priced items!)

Firstly I was excited to try out the "Nail Art Polish Pen" in white.  


I started with a base of Daily Hues Nail Lacquer in New Beginnings 2015, and doodled on a lace half-moon design using the pen. You need to shake well and then pump the tip a few times to get the polish flowing. I found the pen works best for creating thicker lines, as you have to go over the lines a second time to get it looking nice and solid. So, for basic lines this pen will do the trick, however for intricate designs you will be better off using one of their finer nail art brushes! 


Second for review today are the "Ultrathin Square Matt Glitter" in silver. 


I used the Daily Hues prototype I received with my order (no name, but in my mind I've dubbed it Elsa!) as my base. At first glance, I thought these squares (they're 3mm) would be too wide and flat for my curvy nail beds. However I was happy to see that after a few coats of top coat, the edges don't seem to snag and catch as much. 


I do recommend using a couple generous coats of a quick drying top coat to ensure they won't go anywhere! I also think almond shaped nails are not the best to work with these squares, but squared or even more rounded nails would look best with this shape. I liked the look a lot more than I thought after seeing them in the little storage pot. They catch the light for a super blinged out look. I think these would be best for one-night wear for a fun night out! 


Are you a born pretty addict like I am? Don't forget to use my code SDXP31 next time you shop :)

xo Shawna

Saturday, February 14, 2015

Valentines Collaborations

*disclaimer: the first mani was done a month in advance!
A few groups of us on Instagram collaborated for Valentine's Day (collab pics below!). One was typical v-day lovey dove hearts etc, and the other was the opposite - Anti-Valentine's Day! 

For the first collaboration, organized by @nebularnailz, we didn't have any specific theme. I didn't want to do your typical in-your-face pink and red palette -  so after I painted on a coat of the gorgeous chrome Push and Shove by OPI, I decided dry brushing would provide just the hint of colours I was after. 


Products Used
OPI Push and Shove
OPI Mod About You
Deborah Lippmann Jessa
China Glaze Fast Forward
Dotting Tools from Amazon


I actually tested out painting little hearts and it was a very pathetic attempt.  (This was before I discovered how to use a dotting tool to make the entire heart). So, instead I went for a more abstract look by dotting an outline of a heart on a few accent fingers. I actually liked the way it turned out, and it was pretty simple and very quick to do!


And here's the final product of the first collaboration.


Next up, we have the Anti-V-day Collab! This was put on by @vampireprincessheart. I was thinking along the line of a "blackened heart" so I used saran wrap to create the effect on the two middle fingers. I was hoping the hearts would be more distinct so I don't completely love the way they turned out, but the amazing girls I collaborated with assure me it's great! Thanks ladies you are such sweethearts! 


Products Used
Deborah Lippmann Jessa
Wet n' Wild Black Creme
Finger Paints Striper Ch-Art-Coal Black
Cuter Cuticles Cutie Guard
China Glaze Fast Forward

And this is the result :)


Did you do anything to celebrate (or protest) Valentine's this year?

xo Shawna

Friday, February 13, 2015

Valentine's Plaid

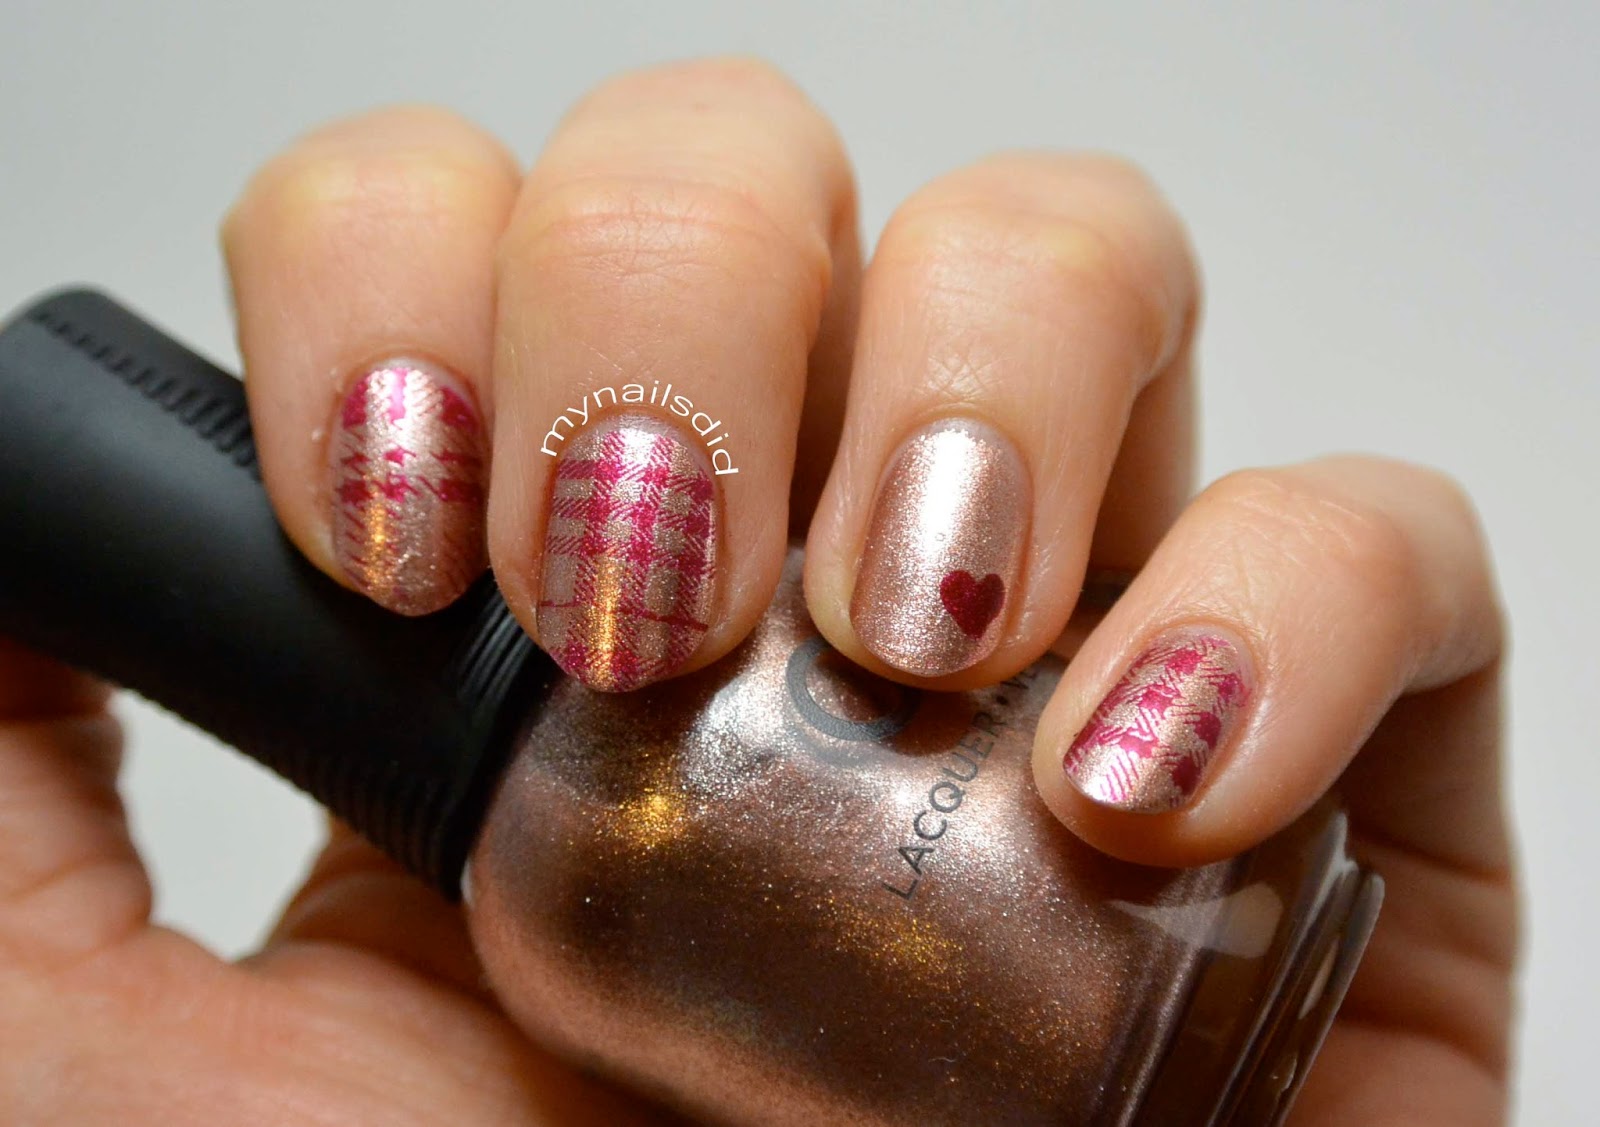
So I ordered the MoYou hipster plate with all the plaids back in December, and am just using it now! As much as I love stamping, a lot of times I just don't want to deal with the cleanup. (And I mean actual cleaning up, not just the cuticles!) However, with all the pinks and reds I've been rocking the last week, a plaid mani was stuck in my mind so I finally made it happen. 


Products Used
Orly Rage
Daily Hues Nail Lacquer Willa
China Glaze Fast Forward
MoYou Hipster 06
Dotting Tool from Amazon


I received my swap package from the Very Canuck Swap that I helped organize with Sammy (owner of Cuter Cuticles)! I got so many great goodies, click on over to my Instagram to check them out. My girl even included goodies for my fur babies- what a sweetheart! Thanks Kait! I have been lusting after Orly Rage, a gorgeous rose-gold foil, for quite some time. It did not disappoint! 


I've got one more mani coming tomorrow as well as a few collaborations in celebration (or the opposite!) of V-day. 

Any exciting Valentines (or singles awareness day) plans?

Monday, February 9, 2015

Valentine's Pond Mani

I don't get enough use of the gorgeous pink jelly I got from Echoes polish months ago. (I guess that's the sad reality of a polish stash of 100+!). So when I saw a gorgeous pond mani with hearts on IG the other day, I just had to recreate it. Props to @nails_by_noemmyy for the idea!. 


Products Used
Echoes Polish Pink Freud
China Glaze Snow
China Glaze Fast Forward
Dotting Tools from Amazon


I never understood what people meant when they said the jelly sammiches/ pond manis were "squishy". Now I totally get it, this has about 9 layers of polish and top coat! It's so thick! 


On another note- thank goodness for photoshop. My cuticles are so horrendous right now. Thanks winter!

xo Shawna

P.S. - a pond mani is the nail art version (vs. glitter) of a jelly sandwich- layering nail art between layers of sheer polish!

Friday, February 6, 2015

Candy Hearts Mani

I saw this stamping plate from Bundle Monster when I placed my order in December. I knew I had to have it for some Valentines nail art! I've seen these candy heart sayings stamped over solid nails, but I wanted to do something a little more creative. So I came up with a negative space half-moon sweetheart mani! (I don't know if there's a name for it that's less of a mouthful- I'm sure someone else has come up with this idea before, I just haven't seen it!) This also worked perfectly for this week's theme for the twinkie nail art challenge of "hearts". 


Products Used (thumb - pinky)
Essie Lapis of Luxury
OPI Panda-monium Pink
China Glaze For Audrey
Barry M Coconut
Deborah Lippmann Shoshanna
OPI Manicurist of Seville (stamping)
China Glaze Fast Forward
Bundle Monster 425


I love this mani! I think it's super fun and it turned out exactly like I envisioned. I love all the pastel colours and it works well with the almond nail shape! I just wish the letters stamped a little bit more solid. 


Are you rocking V-day nails?

xo Shawna


Monday, February 2, 2015

The Polished Bookworms - Big Little Lies Nail Art

I was excited to recently learn that one of the nail bloggers I follow had created a book club for nails art lovers - The Polished Bookworms.  I love reading, I love nail art - the perfect combination! The first month found us reading Big Little Lies by Liane Moriarty.  I really enjoyed the book, and when I realized it was set in a beachside Australian town, I was so excited - it brought back some memories of the 7 months I spent traveling around the country! So, when the time came for a mani inspired by the book I went full-on, beachy, seaside theme (albeit a day late. Oops!)


Products Used
OPI Barefoot in Barcelona
Nicole by OPI My Lifesaver
Sally Hansen Pacific Blue
Wet n Wild Black Creme
China Glaze Fast Forward Top Coat
Bundle Monster 503, 508


I created a gradient reminiscent of a beach with sand, ocean and sky. I chose a few images from the Sun Kissed bundle monster collection and stamped overtop. I haven't done a gradient in a while (pre- cutie guard! I ran out of my tester so luckily I just purchased a new one!) and clean-up was SO much easier. I'm glad I stamped overtop, though, because I clearly need more practice - still!


I absolutely love the beachy feel, which is completely the opposite of reality at the moment - there is currently a major snowstorm happening as I type!

Have you done nail art related to a book or movie?

xo Shawna

 
Images by Freepik