Showing posts with label gradient. Show all posts

Monday, April 6, 2015

Mani Swap with NailsTori

It was so hard to choose which mani to recreate when NailsTori & I decided to do a Mani Swap! Eventually I settled on a pretty creme to glitter gradient Tori did around Christmas time, while she chose one of my Halloween manis. We got creative by changing up the colour palettes and the result was two gorgeous new manis! Check out the collage at the end of the post. 


Products Used
Bonita Hostess With the Mostess
Bonita Penny For Your Thoughts
MTL Creations Tara
INM Out The Door Topcoat 
Cuter Cuticles Cutie Guard


I love the springy shades of these Bonita polishes I picked up when I went shopping in the states a few weeks ago. The peach is a bit sheer but luckily the gradient covered up any VNL. I forgot foil polishes almost work too well for sponging on, so the colour is super dense and doesn't blend as well as a gradient. Oh well! 


Check out the collage. Originals are on the left, and recreations on the right. The colours Tori used in her recreation are gorgeous! Love it!


Do you like foil polishes?
xo Shawna


Saturday, March 28, 2015

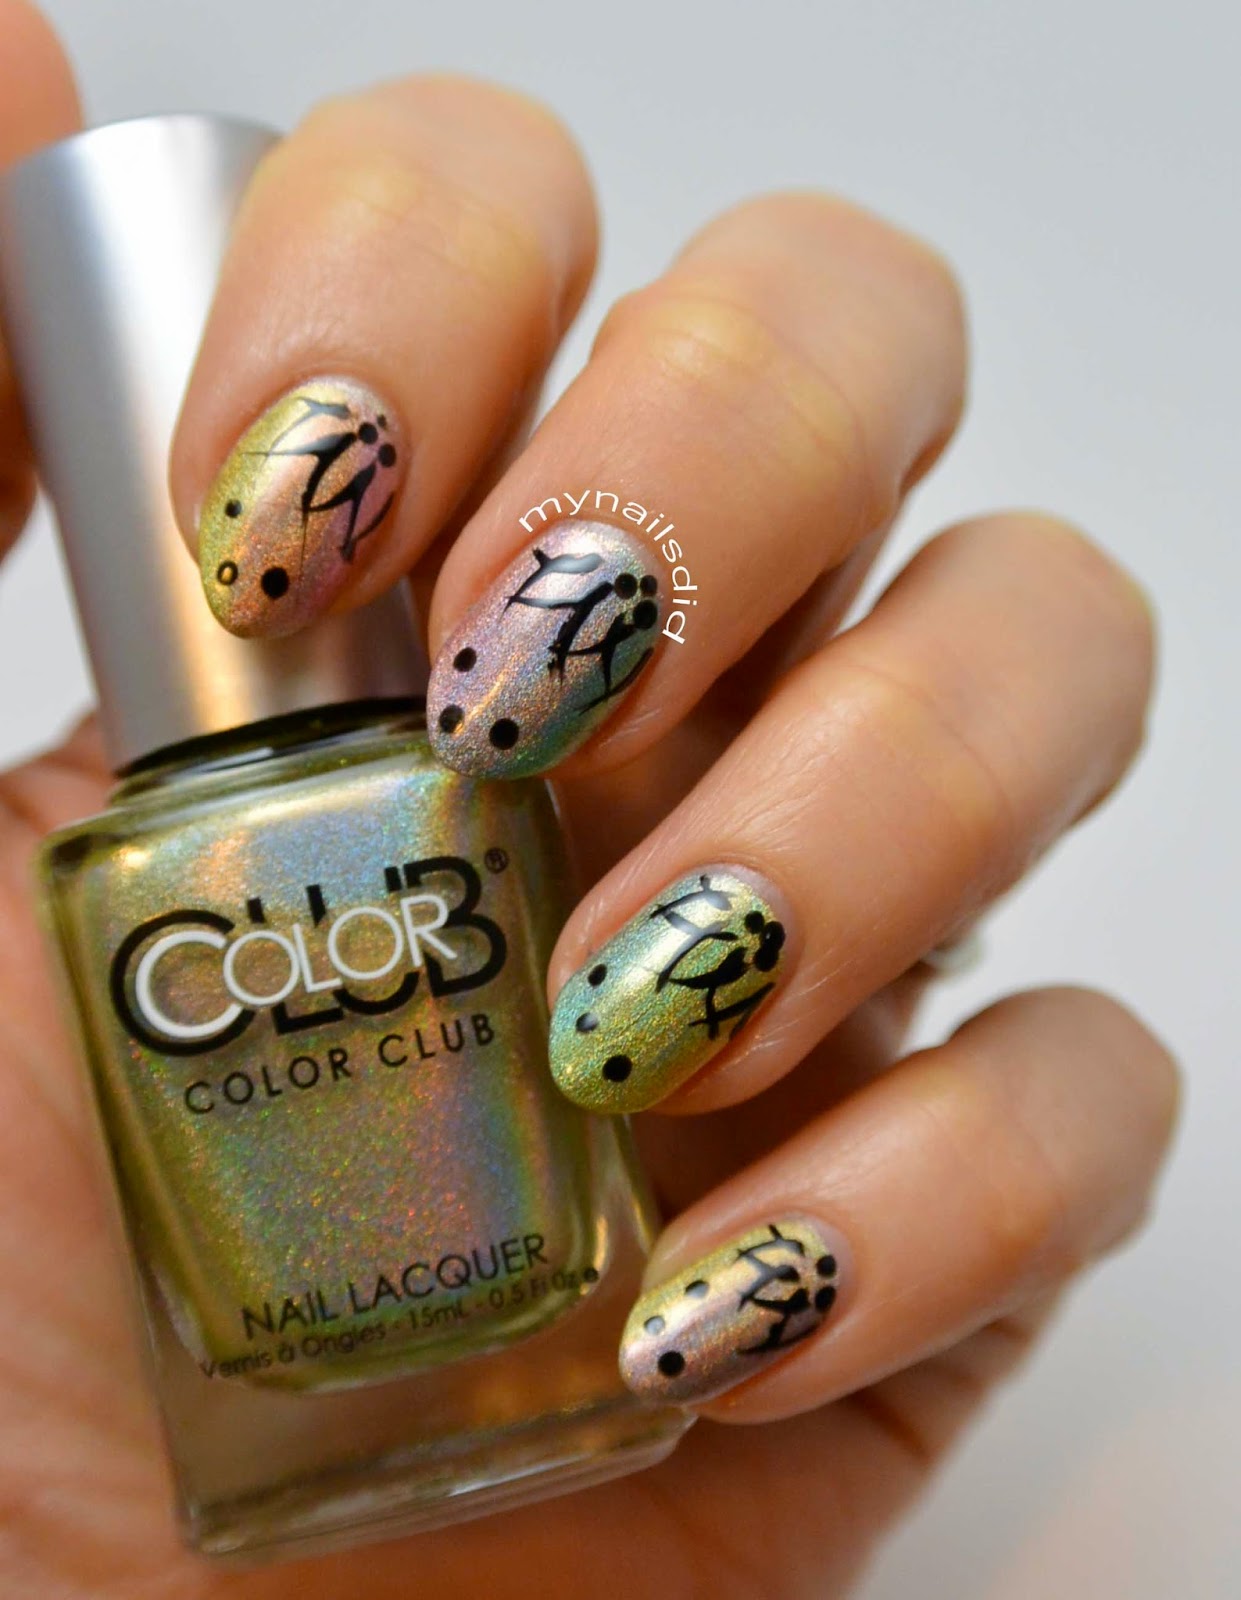
Sheer Holo Gradient Floral Mani

Is my post title long enough? I could have added a few more words to it but had to draw the line! Tonight a bunch of nail gals from the GTA (greater Toronto area, for you non-Ontarians!) met up for dinner and lots of nail chat and swapping! I knew my nails needed to be on point so I eventually settled on a holo faux-gradient with a splash floral design inspired by The Lacquerologist! 


Products Used
Color Club Kismet
Wet n Wild Black Creme
OPI Sheer Tints I'm Never Amberassed
OPI Sheer Tints Be Magentale With Me
OPI Sheer Tints Don't Violet Me Down
OPI Sheer Tints I Can Teal You Like Me
INM Out the Door Topcoat


What's a faux gradient you ask? After I laid down my holo base, I vertically overlapped two sheer tints on each nail- the overlap created a new in-between colour. Sponge-free and easy-peasy! I needed two coats of sheer tints to help the colours pop. 


Here's all the gals! Don't mind my giant face, we needed a selfie stick!


The waiter thought we were a little nuts. No room for food with all the polish up for grabs! A few of us brought our destashes to swap. 


Nails on fleek!


Um, yum. Totally not paleo. Every bite was delish! 


And lastly, me and my girl Sammy! I've raved over the product line, Cuter Cuticles. Check her out if you haven't already! I didn't even need to photoshop my pics today because her oils are so amazing! (I also purchased Unicorn Blood from Bree, and can't wait to rock it!)


What else do you do with your sheer polishes?
xo Shawna

Wednesday, March 4, 2015

Peacock Stamped Gradient

Happy Hump Day!
This mani is my first foray into gradient stamping. I'm kind of on the fence about it. I think next time I use this technique I will centre the division better colours on the nail better, and I will be happier!


Products Used
Ciate Spending Spree
CND Vinylux Rock Royalty
Rimmel Do Not Disturb
China Glaze Fast Forward
Born Pretty Plate BP 30 (SDPX31 for 10% off)


I do love the colours together, and think they work great for the peacock pattern! Can I tell you how awkward Ciate bottles are to pose with?


What do you think of the technique?
xo Shawna

Monday, February 2, 2015

The Polished Bookworms - Big Little Lies Nail Art

I was excited to recently learn that one of the nail bloggers I follow had created a book club for nails art lovers - The Polished Bookworms.  I love reading, I love nail art - the perfect combination! The first month found us reading Big Little Lies by Liane Moriarty.  I really enjoyed the book, and when I realized it was set in a beachside Australian town, I was so excited - it brought back some memories of the 7 months I spent traveling around the country! So, when the time came for a mani inspired by the book I went full-on, beachy, seaside theme (albeit a day late. Oops!)


Products Used
OPI Barefoot in Barcelona
Nicole by OPI My Lifesaver
Sally Hansen Pacific Blue
Wet n Wild Black Creme
China Glaze Fast Forward Top Coat
Bundle Monster 503, 508


I created a gradient reminiscent of a beach with sand, ocean and sky. I chose a few images from the Sun Kissed bundle monster collection and stamped overtop. I haven't done a gradient in a while (pre- cutie guard! I ran out of my tester so luckily I just purchased a new one!) and clean-up was SO much easier. I'm glad I stamped overtop, though, because I clearly need more practice - still!


I absolutely love the beachy feel, which is completely the opposite of reality at the moment - there is currently a major snowstorm happening as I type!

Have you done nail art related to a book or movie?

xo Shawna

Monday, December 15, 2014

zodiac gradient manicure

I am so happy with todays manicure! I recently received my zodiac plate from MoYou (I'm a Sagittarius!) and have been itching to get to work with it. Originally I was going to use a dark blue base, but as soon as I ripped open my package from my secret santa, Ashley aka @beautywithinnails (check out her water marble tutorial- this girl is AMAZING) there were two gorgeous Funky Fingers polishes I knew would be perfect. (Scroll down the for full haul!)


I did a gradient and kept the accent fingers solid to apply some star glitter (also from Ashley). I used a silver stamping polish and the stamping technique to decrease the size of the constellation to fit the whole thing on. 


Products used
Funky Fingers Mood Ring
Funky Fingers Venom
China Glaze Fairy Dust
Mundo de Unas Silver
HK Girl Top Coat
Star Glitter
MoYou London Zodiac 11


The gradient alone was gorgeous but when I added the fairy dust it just took it over the top. So gorgeous and definitely galactic! Perfect base for the stamping. 


Here's a close-up of my favourite nail. 


This is the #santaspolishedbabes haul - 9 polishes including China Glaze, Funky Fingers (a brand apparently only available in certain parts of the US- including a store we passed while shopping there on Friday that I've never been to but will next time!), and Nicole by OPI. 2 "spines" and one loose set of GORGEOUS hand-painted nails/tips. I don't think the water marbled set is visible. Hand baked and painted charms and a bunch of other odds and ends. I was so blown away by the thought and effort she put into this package, and I'm glad our little instagram nail clique organized this! 

What's your sign?

xo Shawna


Friday, October 31, 2014

Candy Corn Gradient

My time management is so bad! I did this manicure Thursday night and wanted to have it up BEFORE the twinkle challenge post... but I didn't get it finished and photographed until just before midnight so I figured it was technically Friday, and went ahead with the challenge post first. Enough babbling! This one is pretty self explanatory. Today is Halloween and I bring you my Candy Corn gradient! I actually don't think candy corn is disgusting, like a lot of people. At least, I didn't - I don't eat a lot of sugar anymore, so I bet I actually would find it gross now. 


Colours used:
Ciate Snow Virgin
L'Oreal Orange You Jealous
NYC Lexington Yellow
HK Girl Top Coat


I've seen a TON of versions of this floating around pre-Halloween. So, I can't credit one single person for he inspiration, just the whole nail community :)

With the first coat of sponging I didn't have high hopes... but the second layer added a lot more pigment, and I love them!


So - do you love or hate candy corn?

xo Shawna


Monday, September 22, 2014

Autumn Inspired Gradient Manicure

I wasn't in the mood for anything complicated tonight, and I haven't done a gradient in a while, so I had a pretty easy time deciding what to do for my newest manicure! 

Seeing as tonight is the autumnal equinox, it only seemed fitting that I break out some of my more autumn-like polishes. 

My Nails Did: Autumn Inspired Gradient Manicure

Polishes Used:
OPI You Don't Know Jaques
OPI Wocka Wocka (I'm pretty sure... it's an unlabelled mini!)
Sally Beauty Gold Glitter Topper
HK Girl Top Coat

My Nails Did: Autumn Inspired Gradient Manicure

I used the sponge technique where you paint the polish directly on, I find it a lot quicker than dabbing the sponge into the polish on plastic. 

My Nails Did: Autumn Inspired Gradient Manicure

I love the look and think perhaps I might not miss my summer palette of pastels as much as I thought! (And who am I kidding- I don't follow the rules anyways :-P)

Do you let seasons dictate your colour palette?

xo Shawna

Monday, September 1, 2014

Purple Ombré Stamped Mani

I was envisioning a purple hued mani when I sat down this afternoon (yay for stat holidays!). I don't actually have a ton of purple shades so I used a base of Essie "Lapiz of Luxury", and used a sponge to create a gradient effect with China Glaza "Grape Juice" and my mini Color Club in neon purple. The Grape Juice has a heavy undertone of silver micro glitter, and the colour effect reminds me of royalty with the sparkly purple ombré!

purple ombre chain link lace stamped manicure

I used a born pretty store stamping plate (item 6450) with Ciate "Snow Virgin" to create a lacy, almost chain-link, effect. I love the way it turned out!

purple ombre chain link lace stamped manicure

 I actually attempted double stamping but it just wasn't working out, the black wasn't popping over the deep purple tones. I'll save that for another manicure!

purple ombre gradient manicure
The base for my stamping.

An off-topic question today: what cuticle treatment do you use? Despite regular oil use, mine are a little ragged!

xo Shawna

Sunday, August 24, 2014

Birds on a Wire Stamped Mani

Tonight's mani has booted out my Paris nails as my new favourite! As soon as I saw the Birds on a Wire on the MoYou Pro Plate #4 I knew it was a must have. The only thing that prevented me from using it earlier was a fear of the fine line work, so I wanted more practice first! 

Birds on a wire Ombre Stamped Mani

First, I created a gradient with:
China Glaze - Naked
L'oreal - Orange You Jealous
Sally Hansen - Pacific Blue
I was going to use an Essie shade in lieu of Pacific Blue but the colour was just too sheer to be really noticeable and I wanted more.

Birds on a wire Ombre Stamped Mani

Next, I used Wet n' Wild Black Creme for the stamping. I paired the delicate (illegible) text from the same plate with the bird image.

Birds on a wire Ombre Stamped Mani

I absolutely love the way this one turned out. The ombre effect on my thumbs are less than perfect - I figure my thumbs are kind of like the first pancake - a write off. 

Birds on a wire Ombre Stamped Mani

Do you have issues getting your thumbs sponged as nicely as the rest?

xo Shawna

Wednesday, August 20, 2014

Blue Ombré Paris Stamped Mani

Yesterday, Shoppers Drug Mart had an amazing deal on Essie polish, which worked out to $4.50 a bottle in multiples of 2. So I grabbed 4 different shades - and since I bought them at two locations I didn't realize until after how similar they all are! You like what you like, right? They're gorgeous light blues, lavenders and teals. I'll have to do a swatch post soon!

I also managed to get my hands on a couple bottles of the original formula of Sally Hansen's "Pacific Blue". Being new to the nail art world, I've only just discovered this "holy grail" shade, and my first attempt at buying actually landed me the new formula. I didn't love the colour so I'll be returning the new versions. SDM's in Milton are a gold mine for the original, with 9 bottles between the two stores I visited - it doesn't seem like there are a whole lot of nail enthusiasts in Milton, or else they'd all be gone! 

On to today's mani. I used Essie "Lapiz of Luxury" as the base (one of my new shades) and sponged a gradient with "Pacific Blue". 

essie lapis of luxury nail polish

Lapiz of Luxury swatched. 

essie lapis of luxury & sally hansen pacific blue nail polish

I love the way the ombré effect looks with these two shades! 

blue ombre parisian MoYou mani

I used MoYou London Tourist plate 21, which has a definite Parisian theme. There are a ton of cute designs, so I chose one floral as the main design with two accent nails on each hand. 

blue ombre parisian MoYou mani

Clearly, getting my stamps straight is something I need a little practice with! I don't mind too much, in particular I think the Eiffel Tower looks cute on a jaunty angle!

blue ombre parisian MoYou mani

On my right hand, I love the little moustaches! 

Despite my lack of centering some of the images, I think this mani is my favourite so far. (Not that I have a whole lot to choose from!). I used Ciate "Snow Virgin" as the stamping colour, and of course topped it off with HK Girl Top Coat which is becoming a fast favourite.

Does your nail polish stash have all the colours of the rainbow, or do you tend to gravitate towards the same colour family?

xo Shawna

 
Images by Freepik