Showing posts with label glisten and glow. Show all posts

Friday, October 31, 2014

Candy Corn Gradient

My time management is so bad! I did this manicure Thursday night and wanted to have it up BEFORE the twinkle challenge post... but I didn't get it finished and photographed until just before midnight so I figured it was technically Friday, and went ahead with the challenge post first. Enough babbling! This one is pretty self explanatory. Today is Halloween and I bring you my Candy Corn gradient! I actually don't think candy corn is disgusting, like a lot of people. At least, I didn't - I don't eat a lot of sugar anymore, so I bet I actually would find it gross now. 


Colours used:
Ciate Snow Virgin
L'Oreal Orange You Jealous
NYC Lexington Yellow
HK Girl Top Coat


I've seen a TON of versions of this floating around pre-Halloween. So, I can't credit one single person for he inspiration, just the whole nail community :)

With the first coat of sponging I didn't have high hopes... but the second layer added a lot more pigment, and I love them!


So - do you love or hate candy corn?

xo Shawna


Pumpkins and Leaves - Twinkie Nail Art Challenge

As much as I liked Tuesday's mani, I was ready to pump it up with some more Halloween-themed nail art. The final Friday for October's theme for the Twinkie Nail Art Challenge is "Halloween/ Harvest" and I think this fits the bill! (I actually did this nail art Wednesday night, but saved the post to keep to the schedule :) I've seen a lot of pumpkin manicures that looked simple enough, so I choose a few accent nails on each hand. I first painted the shape with a few different white polishes so the colours would pop, and the layered the orange, green and brown on top. I used MoYou Explorer Plate 21 for the leaves. 


Polishes used:
BK Matt White (stamping)
Ciate Snow Virgin & Finger Paints Hip Hip Hue-Ray (undies)
China Glaze Be More Pacific
OPI You Don't Know Jacques
L'oreal Orange You Jealous


I love the way the white stamping really pops over the purple base.


Hope you enjoy!

xo Shawna

Sunday, September 7, 2014

Neon Tribal Inspired Nails

Happy Sunday everyone! Today I'm excited to share the fun manicure I created that has been in my mind for a while. Tribal (geometric) manicures are remaining a popular trend in the nail art world and I couldn't wait to jump on board. I bought black and white striping paints the other day and I decided I was ready to take on a whole manicure inspired by tribal prints!

For ideas, I googled "Tribal Print" and I had a few ideas already tucked away in my mind. My favourite nails are the design on my right thumb/ left middle finger, and the design on my left thumb/ right index finger!

Neon Pool Party Tribal Geometric Manicure

Neon Pool Party Tribal Geometric Manicure

To create this look, I used:
China Glaze Pool Party 
Finger Paints Hip-Hip-Hue-Ray!
Finger Paints Ch-Art-Coal Black
HK Girl Top Coat

Neon Pool Party Tribal Geometric Manicure

Neon Pool Party Tribal Geometric Manicure

Are you on board with the tribal trend? Which designs are your favourite?

xo Shawna

Friday, September 5, 2014

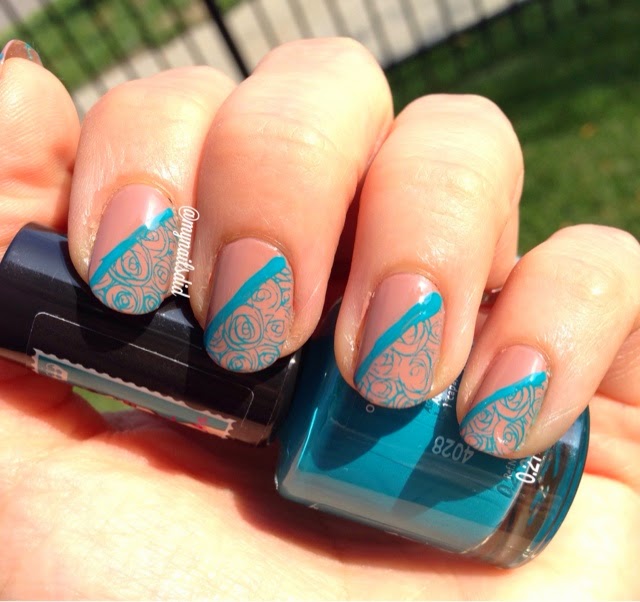
Twinkie Nail Art Challenge - Nude & Teal Floral Stamped Mani

I decided a few days too late that I would have liked to join the 31 day mani challenge. Luckily I stumbled upon another gem of a nail art challenge, which involves only one mani per week - definitely doable! 

The #twinkienailartchallenge is hosted by @spilledmilknails and @polishedbybeckie on Instagram. The first theme of the month is a teal mani for ovarian cancer awareness. At first I had a different vision involving a dark on light lace stamped mani. The more I thought about it though, the more I decided it was high time to use my princess collection plate 09 from MoYou - the first pattern I fell in love with! 

Nude & Teal Rose Stamped Mani MoYou

I decided to pair the delicate rose pattern with a more neutral base, and settled on one of my favourite (ok, only) nudes which is OPI Barefoot in Barcelona. I just love it, it goes on smoothly with a gorgeous creme finish. Rimmel's Do Not Disturb provided the perfect pop of colour and proved to be a great stamping polish too! I'll have to grab more colours from that collection. 

Nude & Teal Rose Stamped Mani MoYou

Wanting to be a bit more creative than another full nail stamping mani, I used scotch tape to divide my nail in half on the diagonal. A great tip I found from a defunct blog (Chloe's Nails) suggested sticking the tape to the back of your hand a couple of times so it was less likely to wreck your base (which I let dry super well anyways!). After prepping the stamp, I applied the tape and stamped to minimize the amount of time the tape was on the nail, working one nail at a time. 

Nude & Teal Rose Stamped Mani MoYou

I used a liner brush to paint a thin line of the teal polish to make the pattern really stand out. Lastly, I finished with a coat of HK girl top coat. Voila! This was so fun and I am looking forward to the rest of the challenge for more inspiration! 


xo Shawna 

Wednesday, August 20, 2014

Blue Ombré Paris Stamped Mani

Yesterday, Shoppers Drug Mart had an amazing deal on Essie polish, which worked out to $4.50 a bottle in multiples of 2. So I grabbed 4 different shades - and since I bought them at two locations I didn't realize until after how similar they all are! You like what you like, right? They're gorgeous light blues, lavenders and teals. I'll have to do a swatch post soon!

I also managed to get my hands on a couple bottles of the original formula of Sally Hansen's "Pacific Blue". Being new to the nail art world, I've only just discovered this "holy grail" shade, and my first attempt at buying actually landed me the new formula. I didn't love the colour so I'll be returning the new versions. SDM's in Milton are a gold mine for the original, with 9 bottles between the two stores I visited - it doesn't seem like there are a whole lot of nail enthusiasts in Milton, or else they'd all be gone! 

On to today's mani. I used Essie "Lapiz of Luxury" as the base (one of my new shades) and sponged a gradient with "Pacific Blue". 

essie lapis of luxury nail polish

Lapiz of Luxury swatched. 

essie lapis of luxury & sally hansen pacific blue nail polish

I love the way the ombré effect looks with these two shades! 

blue ombre parisian MoYou mani

I used MoYou London Tourist plate 21, which has a definite Parisian theme. There are a ton of cute designs, so I chose one floral as the main design with two accent nails on each hand. 

blue ombre parisian MoYou mani

Clearly, getting my stamps straight is something I need a little practice with! I don't mind too much, in particular I think the Eiffel Tower looks cute on a jaunty angle!

blue ombre parisian MoYou mani

On my right hand, I love the little moustaches! 

Despite my lack of centering some of the images, I think this mani is my favourite so far. (Not that I have a whole lot to choose from!). I used Ciate "Snow Virgin" as the stamping colour, and of course topped it off with HK Girl Top Coat which is becoming a fast favourite.

Does your nail polish stash have all the colours of the rainbow, or do you tend to gravitate towards the same colour family?

xo Shawna

Thursday, August 14, 2014

silver & roses nail stamping manicure

So, after my MoYou plates arrived last night I immediately set to work practicing. My first few attempts weren't great until I remembered reading somewhere it helps to prep a new stamper by lightly buffing the surface with a nail file. So, I did that and voila! Stamping magic was happening. I had a really hard time not only choose which image(s) to stamp for my first mani, but which colours. I settled on using my new shade "Butterfly Kisses" by L'Oreal (as pictured in yesterday's post) and stamping with my Sally Hansen "Hi-Ho Silver" that you may remember from my galaxy nails

Silver & Roses Stamping Manicure

I used two rose patterns from the MoYou Pro Plate 04 and alternated nails. One is a rose pattern and the other is the same pattern in the negative. 

Silver & Roses Stamping Manicure

It's really hard to capture the details with the silver being so reflective, but I love the way it turned out. The roses seem really delicate in the pink and silver shades. 

Silver & Roses Stamping Manicure

And of course, I topped it off with my new HK Girl topcoat. It's too early to make and solid judgements, but it definitely dried fast and didn't get any imprints when I went to bed later. (Conversely, I just had to chuck my old bottle of Seche as it's completely gummed. I considered buying a replacement bottle since I found it for about $6 at Winners, but decided it was unnecessary with having HK Girl). 

What do you think?

xo
Shawna


Wednesday, August 13, 2014

Nail Mail - MoYou London Stamping Plates!

So I've gone a little overboard the past week or two with online shopping, since I discovered the world of nail art and stamping specifically! The packages have already started to roll in. I'm really impressed with the shipping times of nail polish canada and MoYou London! I also snagged some awesome deals on L'Oreal polish at best buy online of all places, half of which shipped super quick and oddly the other half I'm still waiting for.

nil mail moYou stamping & loreal

Here are the goodies! Top to bottom I have HK Girl Top Coat, which was shipped for free from Nail Polish Canada. It cost few dollars more than purchasing directly from the buyer, but the free shipping more than made up for the difference since I only wanted the one item. I've just used it for the first time so I don't have an opinion yet (other than it does seem to dry quickly!) but loads of other nail bloggers and 'grammers have raved about it, so I jumped on board. The L'Oreal polishes are Orange You Jealous, Butterfly Kisses and Because You're Worth It. I got 4 MoYou plates from different collections, as well as the XL double sided stamper. I think for my nail length, the XL is unnecessary but I liked the double sided-ness - it let me work back and forth before cleaning each side, so the stamping process seemed to flow more smoothly. Check out the plates up close. They are gorgeous!

MoYou London Nail art Stamping Plates

Explorer Collection 21 

MoYou London Nail art Stamping Plates

Princess Collection 09 

MoYou London Nail art Stamping Plates

Pro Collection 04 


Tourist Collection 21

MoYou London Nail art Stamping Plates

I'm curious to receive my stamper from the born pretty store, (affiliate link) to see how the firmer one compares to the squishy XL stamper. What stamping plates and stampers have you tried? What's your favourite brand?

xo
Shawna
 
Images by Freepik