Showing posts with label moyou london. Show all posts

Friday, April 24, 2015

Seaside Stamped Gradient

I'm glad I photographed this mani ASAP because I proceeded to dent all the tips when I left the house before the fairy dust properly dried! Oops. This is my mani for week four of the April TGIF nail art challenge- stamped gradient. I wanted a light base colour that would allow my stamping shades to pop, so I dug deep into my drawer and pulled out Panda-Monium Pink, which I'm pretty sure is the first OPI colour I ever fell in love with. I finally used my last untied MoYou London plate, which I ordered back on Christmas! Baby steps, right? I find the longer I do nail art, the less i reach for stamping plates - but they're definitely nice for a quick, pretty mani. 


Products Used
OPI Panda-Monium Pink
Sally Hansen Pacific Blue
Konad Princess Polish Deep Jungle
China Glaze Fairy Dust
INM Out the Door Top Coat


These two stamping colours blended together beautifully. It's too bad this mani got ruined, but I am going to pick up my cutting machine from FedEx tonight (an aside: I hate FedEx!) so I'm not too upset because I'm going to be all about testing the nail vinyls soon! Watch for the shop opening announcement and specials!


xo Shawna

Wednesday, March 11, 2015

Gold & Blue Creative Stamper Mani

I received my Creative Stamper yesterday after trying to track one down for a reasonable cost to Canada. Finally, my investigating led me to Eat Sleep Polish, the newest stockist and Canadian to boot! Caterina is also a doll. So, I got to work tonight and had fun with this super squishy stamper! 


I wanted to start making a dent in my "untrieds" which I've sorted into a box. I'm hoping to work them all into manis over the next month or so, in some way or another!


Products Used
China Glaze Intelligence Integrity Courage
OPI Golden Waves
China Glaze Fast Forward
MoYou London Bridal 06
Creative Stamper


Here's a macro of the goodness :) The gold is definitely soft and delicate as the stamping polish but the stamper picked it up no problem! 


I love the stamper. It is so soft, I had no issues using it as I read some comments on IG to roll instead of press, and to prime by washing with soap and water (or magic eraser). Worked like a charm! The polish I used is a little thin but I can't wait to try it out with something a little bit more bold. 


Do you have a big untried stash?

xo Shawna


Thursday, December 25, 2014

Red Creme Sweater

Hello everyone! Firstly, I'll apologize in advance for my raggedy cuticles in these pics. Secondly, YAY for finally doing the Christmas manicure I've been dreaming of all along- sweater nails over a classic red creme! And double yay to my fiancé for including a fast dry top coat in my stocking. My HK Girl was on it's last legs and as awesome as it is, I can't bring myself to pay full price + shipping for it! (I got it on sale with free shipping last time, totally spoiled). 


Products used
China Glaze Tip Your Hat
BK Matt White
China Glaze Fast Forward Top Coat
MoYou London Festive 06


My friend gifted me a few polishes for my birthday earlier in the month, and this red was one of them. I must admit I was very on the fence about it. I don't normally like reds. However, once I finally used it, I couldn't stop! I think this is the 4th mani in a row in which I have used this polish. She nailed it! 

What polish colours do you usually avoid? Do you ever surprise yourself and fall in love with a shade you were convinced you wouldn't like?

xo Shawna


Monday, December 22, 2014

candy cane stripes

I've been wanting to do a candy cane striped mani, and I knew the red creme from the China Glaze holiday 2014 collection would be the perfect pairing with white. I'd also been itching to try watermarbling again after watching the video tutorial I linked the other day, so I figured why not kill two birds with one stone!


 Products Used
China Glaze Snow (marbling)
China Glaze Tip You Hat
BK Matt White (stamping)
HK Girl Top Coat
MoYou Festive 06


I am really happy with how the water marble turned out! The tutorial definitely gave great tips. I also used the tape to minimize cleanup this time and it worked like a charm (until I got excited to do the opposite hand and forgot to tape up for that one- oops!)


There will probably be one more post before Christmas! Do you have any exciting Christmas manis planned?

xo Shawna

Monday, December 15, 2014

zodiac gradient manicure

I am so happy with todays manicure! I recently received my zodiac plate from MoYou (I'm a Sagittarius!) and have been itching to get to work with it. Originally I was going to use a dark blue base, but as soon as I ripped open my package from my secret santa, Ashley aka @beautywithinnails (check out her water marble tutorial- this girl is AMAZING) there were two gorgeous Funky Fingers polishes I knew would be perfect. (Scroll down the for full haul!)


I did a gradient and kept the accent fingers solid to apply some star glitter (also from Ashley). I used a silver stamping polish and the stamping technique to decrease the size of the constellation to fit the whole thing on. 


Products used
Funky Fingers Mood Ring
Funky Fingers Venom
China Glaze Fairy Dust
Mundo de Unas Silver
HK Girl Top Coat
Star Glitter
MoYou London Zodiac 11


The gradient alone was gorgeous but when I added the fairy dust it just took it over the top. So gorgeous and definitely galactic! Perfect base for the stamping. 


Here's a close-up of my favourite nail. 


This is the #santaspolishedbabes haul - 9 polishes including China Glaze, Funky Fingers (a brand apparently only available in certain parts of the US- including a store we passed while shopping there on Friday that I've never been to but will next time!), and Nicole by OPI. 2 "spines" and one loose set of GORGEOUS hand-painted nails/tips. I don't think the water marbled set is visible. Hand baked and painted charms and a bunch of other odds and ends. I was so blown away by the thought and effort she put into this package, and I'm glad our little instagram nail clique organized this! 

What's your sign?

xo Shawna


Sunday, November 23, 2014

Sweater Nails

This was a fun mani because I didn't have to do it myself! One of my friends owns a salon/spa in town and had mentioned she would like to learn stamping to be able to provide a quick nail art service to her clients. In exchange for my teaching services, I scored a free mani and also a blowout. No complaints over here :) 


Products used
CND Vinylux Rock Royalty
BK Matt White
MoYou Festive 06


I love both the polish colour (I want to find a non-vinylux dupe!) and the stamps. I love the way the one sweater design looks on an angle (my middle finger). I am already imagining the snowflakes over a glittery blue base. So many ideas, so little time! 


Do you like the sweater nail trend?

xo Shawna


Friday, October 24, 2014

Jelly Sammich Mani - Twinkie Nail Art Challenge

Good afternoon! I'm excited to be back in the swing of the weekly Twinkie Nail art challenge :) This week is "Jelly Sammich"! And in other big nail news... I have a new nail shape, almond shorties! They feel really strange, especially as I type. I had my plain old oval nails for quite a while - I'm guessing more than a year! They're growing on me though.

I had just the polish in mind, which I specifically bought for this kind of mani - Pink Freud from Echoes Polish. This is a new-to-me technique and while I don't totally love how the stamping images I chose end up looking combined, I can see myself playing with the technique in the future with different designs. And maybe more chunky glitter!


Polishes used:
Echoes Polish Pink Freud
BK Matt White (use code SDPX31 for 10% off!)
MTL Creations Tara
Sally Girl Silver Glitter
Ciate Speed Pro Top Coat
HK Girl Top Coat


I used a few plates, MoYou London Pro Plate 04, and m66 and QA91 from born pretty store. (SDPX31 for 10% off!) I think next time I'll just layer floral prints instead of different images. They kind of got lost!


Have you tried a jelly sammich mani yet?

xo Shawna


Tuesday, October 7, 2014

Thermal Explorer Stamped MoYou Mani

I haven't posted a stamped manicure lately, since I've been branching out and trying different hand-painted nail art lately. Tonight I swatched another shade from MTL, a green thermal polish. When deciding which plate to stamp with, I was drawn to the explorer collection again - I seem to connect these images to a green background!

My Nails Did: Thermal Polish + MoYou Stamping Mani

Green usually isn't a popular polish shade in my repertoire, but I loved the thermal combo, which turns a darker green shade when cold. At first I thought I was broken- it was taking a while to achieve the colour change and my other thermal polish is so subtle, I thought maybe my body chemistry just wasn't working for them. But lo and behold, after soaking my nails in a mini ice bath for 30 seconds, I saw it! Watch for these swatches in that upcoming post I promised. (Soon!) My fiancé is on night shifts which means I can stink up the condo to my hearts content :) 

My Nails Did: Thermal Polish + MoYou Stamping Mani

Polishes Used:
MTL Creations Sam the Shifter
Wet n Wild Black Creme
HK Girl Top Coat (not applied until after photos)
MoYou London Explorer 21

My Nails Did: Thermal Polish + MoYou Stamping Mani

I actually like my "Cinderella" hand more for this mani! I experimented with more variety in the pattern placement and really like how it turned out. I think the green & black make it a great Halloween colour combination!

My Nails Did: Thermal Polish + MoYou Stamping Mani

Do you have a colour family you generally just don't like in nail polish?

xo Shawna

Friday, September 5, 2014

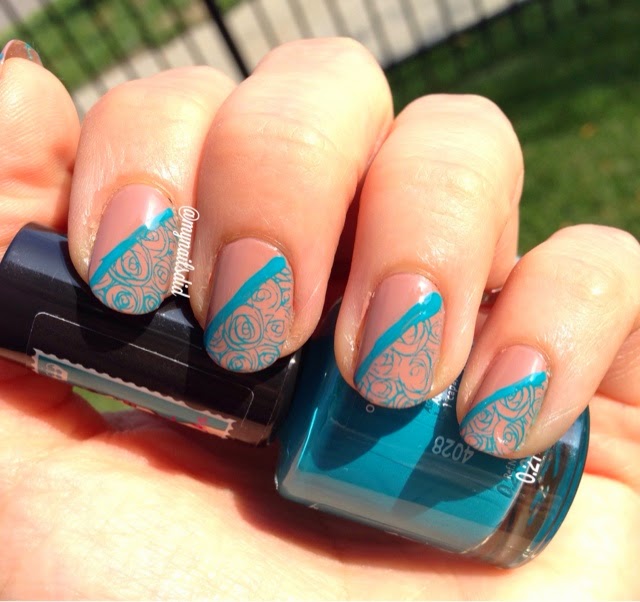
Twinkie Nail Art Challenge - Nude & Teal Floral Stamped Mani

I decided a few days too late that I would have liked to join the 31 day mani challenge. Luckily I stumbled upon another gem of a nail art challenge, which involves only one mani per week - definitely doable! 

The #twinkienailartchallenge is hosted by @spilledmilknails and @polishedbybeckie on Instagram. The first theme of the month is a teal mani for ovarian cancer awareness. At first I had a different vision involving a dark on light lace stamped mani. The more I thought about it though, the more I decided it was high time to use my princess collection plate 09 from MoYou - the first pattern I fell in love with! 

Nude & Teal Rose Stamped Mani MoYou

I decided to pair the delicate rose pattern with a more neutral base, and settled on one of my favourite (ok, only) nudes which is OPI Barefoot in Barcelona. I just love it, it goes on smoothly with a gorgeous creme finish. Rimmel's Do Not Disturb provided the perfect pop of colour and proved to be a great stamping polish too! I'll have to grab more colours from that collection. 

Nude & Teal Rose Stamped Mani MoYou

Wanting to be a bit more creative than another full nail stamping mani, I used scotch tape to divide my nail in half on the diagonal. A great tip I found from a defunct blog (Chloe's Nails) suggested sticking the tape to the back of your hand a couple of times so it was less likely to wreck your base (which I let dry super well anyways!). After prepping the stamp, I applied the tape and stamped to minimize the amount of time the tape was on the nail, working one nail at a time. 

Nude & Teal Rose Stamped Mani MoYou

I used a liner brush to paint a thin line of the teal polish to make the pattern really stand out. Lastly, I finished with a coat of HK girl top coat. Voila! This was so fun and I am looking forward to the rest of the challenge for more inspiration! 


xo Shawna 

Saturday, August 30, 2014

My Nail Polish Organization

I was excited to be able to get out to Ikea today to pick up a Kallax insert for my Expedit shelf. (They recently changed the Expedit line to Kallax - It's slightly thinner and therefore uses less material = more eco conscious). I've been eyeing one since my polish collection started outgrowing my previous storage, shortly after I wrote the post on my polish stash!

Ikea nail polish storage KALLAX

It wasn't too difficult to put the unit together, although once I finished I realized I could have gotten use out of my fiancés power drill! Probably best I stayed away from the power tools, though - I'm definitely not handy. 

Ikea nail polish storage KALLAX

In the top drawer, I have all my nail art supplies. This consists of: my black & white polishes for stamping, my Ciate caviar beads, rhinestone wheel, nail wraps, nail decals, stamping plates & scrapers, brush set, dotting tool, orange wood cuticle pushers, feathers, files and a few other odds & ends. 

Ikea nail polish storage KALLAX

My polish drawer was loosely organized by colour. Base/ top coats and nail treatments in the back! 

There's a few other great storage solutions for polish from Ikea including the Helmer (the gold standard for polish collections, I think!) and the Alex. I would love a Helmer however there is just no where else to cram another storage unit in my condo! 

What's your storage look like? Do you organize by brand or by colour?

xo Shawna

Sunday, August 24, 2014

Birds on a Wire Stamped Mani

Tonight's mani has booted out my Paris nails as my new favourite! As soon as I saw the Birds on a Wire on the MoYou Pro Plate #4 I knew it was a must have. The only thing that prevented me from using it earlier was a fear of the fine line work, so I wanted more practice first! 

Birds on a wire Ombre Stamped Mani

First, I created a gradient with:
China Glaze - Naked
L'oreal - Orange You Jealous
Sally Hansen - Pacific Blue
I was going to use an Essie shade in lieu of Pacific Blue but the colour was just too sheer to be really noticeable and I wanted more.

Birds on a wire Ombre Stamped Mani

Next, I used Wet n' Wild Black Creme for the stamping. I paired the delicate (illegible) text from the same plate with the bird image.

Birds on a wire Ombre Stamped Mani

I absolutely love the way this one turned out. The ombre effect on my thumbs are less than perfect - I figure my thumbs are kind of like the first pancake - a write off. 

Birds on a wire Ombre Stamped Mani

Do you have issues getting your thumbs sponged as nicely as the rest?

xo Shawna
Wednesday, August 20, 2014

Blue Ombré Paris Stamped Mani

Yesterday, Shoppers Drug Mart had an amazing deal on Essie polish, which worked out to $4.50 a bottle in multiples of 2. So I grabbed 4 different shades - and since I bought them at two locations I didn't realize until after how similar they all are! You like what you like, right? They're gorgeous light blues, lavenders and teals. I'll have to do a swatch post soon!

I also managed to get my hands on a couple bottles of the original formula of Sally Hansen's "Pacific Blue". Being new to the nail art world, I've only just discovered this "holy grail" shade, and my first attempt at buying actually landed me the new formula. I didn't love the colour so I'll be returning the new versions. SDM's in Milton are a gold mine for the original, with 9 bottles between the two stores I visited - it doesn't seem like there are a whole lot of nail enthusiasts in Milton, or else they'd all be gone! 

On to today's mani. I used Essie "Lapiz of Luxury" as the base (one of my new shades) and sponged a gradient with "Pacific Blue". 

essie lapis of luxury nail polish

Lapiz of Luxury swatched. 

essie lapis of luxury & sally hansen pacific blue nail polish

I love the way the ombré effect looks with these two shades! 

blue ombre parisian MoYou mani

I used MoYou London Tourist plate 21, which has a definite Parisian theme. There are a ton of cute designs, so I chose one floral as the main design with two accent nails on each hand. 

blue ombre parisian MoYou mani

Clearly, getting my stamps straight is something I need a little practice with! I don't mind too much, in particular I think the Eiffel Tower looks cute on a jaunty angle!

blue ombre parisian MoYou mani

On my right hand, I love the little moustaches! 

Despite my lack of centering some of the images, I think this mani is my favourite so far. (Not that I have a whole lot to choose from!). I used Ciate "Snow Virgin" as the stamping colour, and of course topped it off with HK Girl Top Coat which is becoming a fast favourite.

Does your nail polish stash have all the colours of the rainbow, or do you tend to gravitate towards the same colour family?

xo Shawna

Sunday, August 17, 2014

green mani Sunday

Happy Sunday everyone!

There is a green theme going around the nail instagram feed today, to support depression awareness in light of the recent passing of Robin Williams. If you search the hashtag #fightforlightandlive, you'll find a whole bunch of IG'ers who have painted their nails green today!

As I posted a few days ago on Facebook, I hope the positive that comes from the tragic event of a few days ago is to bring awareness to depression. If you are depressed, or even just not feeling like yourself and can't quite pinpoint it, you can ALWAYS ask for help - whether it be a family member or friend, or reaching out for support to a support line. Find a list of all the Canadian hotlines here.

To lighten things up, on to today's mani!

I've combined safari green with a leafy stamp, for a very nature inspired look!

green leaves nature inspired stamping manicure

The base colour is L'Oreal "Safari Chic". This was my first time using this new (to me) polish, and I was really impressed with the coverage of just one coat (as pictured). 

green leaves nature inspired stamping manicure

The white is Ciate "Snow Virgin". This is my first time using it to stamp, and again I'm impressed with the coverage from the polish. 

green leaves nature inspired stamping manicure

Don't be fooled by the bottle in the pic, I actually used HK Girl Top Coat. I had just packed away all my polish supplies when I redid the pics, and this bottle is being donated to my sister so it was readily available for a photo op!

Also, I am really having issues getting crisp photos, so hopefully you get the point. 

There you have it. Hope you had a great weekend!

xo Shawna

 
Images by Freepik