Showing posts with label HK girl. Show all posts

Tuesday, April 14, 2015

Nail Art Basics: Top Coat

At the nail girl meet up, Bree had the brilliant suggestion of blogging about top coats for those new to the nail art (or nail polish world, in general) about the difference between clear nail polish and actual top coat. I loved the idea so much I decided to start a mini-series of posts on nail art basics for beginners!

There are a ton of brands so I'll review some of the big names as well! There are many more I haven't tried, so I will stick to the ones I've personally used. 

So - top coat. Why should you invest in a proper top coat instead of using whatever clear coat you happen to have kicking around? Well, your choice of top coat can make or break your mani! "Clear coat" (a regular nail polish formula without any pigment) takes just as long to dry as your nail colour. So, while it might add some gloss to your manicure, it can take forever to thoroughly dry, and often you will bump your nails before the clear coat has properly set- resulting in annoying chips, smudges and sometimes bed sheet marks while you sleep!

However, by choosing a good fast dry top coat, you can pretty much eliminate these annoyances from occurring! The faster drying of the bunch are dry to the touch within a few minutes, and rock hard and ready to roll way sooner than regular polish. You can even slick a layer on over still tacky polish and it will save you from smudges! 

Fast dry top coats are especially great for detailed nail art. If your manicure has layer of polish that needs to be dry before you move onto the next step (think, stamping or striping tape), a fast-dry coat can literally save you hours of dry time! If you're a night owl like me, you can do your nails right before bed and know you'll be ok in the morning! 

There is a technique for applying top coat to nail art, as well. You want to "float" the polish onto the nail - basically, to avoid having the brush actually touch the polish so it doesn't drag. If your brush is too dry, or you're using too much pressure, the brush will drag the polish underneath and cause those unsightly smears of your nail art. If you plan to use a mattifying or scented top coat, I would recommend using the fast dry TC first and then slicking those over top. 

I think that about covers it. If it doesn't convince you, I don't know what will ;) Onto some reviews!

When searching for a good top coat, nail artists usually are looking for 3 main qualities: quick dry time, gloss, and lasting power. It can sometimes be hard to find one that has all three! I will admit I always get tip wear and nail polish doesn't last all that long on me since I'm in gloves all the time at work, so I won't comment too much as to the length of wear. 


Essie (good to go) and China Glaze (fast forward) are both pretty accessible (I've scored them both from Winners at a discounted price) and boast pretty decent scores in all 3 categories. The dry time is relatively quick and decent gloss! At Winners, they're about $6-7 and closer to $10 elsewhere. 


HK girl top coat is hugely popular in the nail art world. It's sold at nailpolishcanada.com in Canada ($9.75 CDN)  or directly from the stockist, Glisten and Glow. I've tried this one and can definitely attest to it's rapid drying time and super glossiness. Also, no shrinkage! This is probably my #1 choice of all the TCs in this post, however I usually go for the convenience of being able to purchase my topcoats in a bricks and mortar store which is why I didn't re-buy!


Seche Vite is also really popular and a little easier to find in retail stores (as opposed to just online). It retails about $10 a bottle, but Sally's often has sales. You can pick it up at Sally's Beauty Supply (P.S. - get yourself a Sally Card!). I personally don't love Seche, I notice the shrinkage (it makes the polish lift at the sides of my nails) and I find it gets thick in the bottle quite quickly. However, it is SUPER shiny and fast-drying. Some people absolutely rave about it, so I think it's one you'd need to test it out for yourself to decide!


INM Out the Door is my newest addition. (I purchased it at Sally's in the states for $5). This is probably the slowest drying in the bunch, however still much faster than a non-fast dry top coat. It's not as glossy as the others, which isn't always a bad thing (especially if you plan to mattify your mani). I did like the lasting power of this top coat though - I rocked my Sand and Stilettos glitter nails for 5 days (which is practically a record for me, I think) and there was nothing beyond minimal tip wear. I have to admit I was impressed! 

So - everything you ever wanted (or maybe didn't want to) know about top coats! I hope this was informative. Let me know in the comments if there are any other topics you would like me to cover that you think would be helpful for nail art newbies!

xo Shawna


Saturday, December 13, 2014

holo christmas sweater

I've been wanting a solid collection of holographic colours for a while, and while I have one gorgeous shade and a topper from echoes polish, I wanted more. As much as I would love to support more indies, currently my budget is should be on lockdown to save for our wedding. So, I decided to order a color club halo hues (2013) collection from amazon (free shipping!) and get a jump start. 

I finally went to pick up the order yesterday and I'm thrilled with the gorgeous holos. The black one, Beyond, was my most coveted and I had to get it on immediately! The photos (and indoor lighting) don't do it justice, this one was hard to appreciate in the dreariness of mid December weather.


I wanted to use my new zodiac plate from MoYou (woot Sagittarius!) but seeing as I was going to our annual family Christmas reunion the next day, I opted for sweater stamping instead. 


Products used
Color Club Beyond
Ciate Speed Pro Top Coat
Mundo de Unas Forest
HK Girl Top Coat
MoYou London Zodiac 11


The line on my ring finger went a bit wonky as I tried rolling the image instead of pressing straight into the squishy pad. Results from stamping: roll when doing someone else's, press in when doing your own. I actually loved my cindy hand as well, which had completely different designs. I didn't do a great cleanup but I included a pic as well! 


Do you love holo or are you over it?

xo Shawna


Monday, November 10, 2014

Striped Mani for Nail Art November

Theme for day 10 of #nailartnov is "Tape Mani". This could be interpreted a few ways (I've used scotch tape before!) but today it was the perfect reason to use my striping tape I received a few weeks ago. The design isn't groundbreaking, I've seen it various times on Instagram, but it seemed like a good basic design for my first time!


Colours used:
Deborah Lippmann Marnie
OPI Wocka Wocka (I think... it's an unlabelled mini)
Echoes Polish Holo Cow
HK Girl Top Coat


I added a holo top coat, although I instantly regretted it. I should have just added a few gems instead but live and learn! It's not the most unique manicure ever, but for my first time I'm still pretty happy with how it turned out. 


Have you worked with striping tape before?

xo Shawna


Friday, October 31, 2014

Pumpkins and Leaves - Twinkie Nail Art Challenge

As much as I liked Tuesday's mani, I was ready to pump it up with some more Halloween-themed nail art. The final Friday for October's theme for the Twinkie Nail Art Challenge is "Halloween/ Harvest" and I think this fits the bill! (I actually did this nail art Wednesday night, but saved the post to keep to the schedule :) I've seen a lot of pumpkin manicures that looked simple enough, so I choose a few accent nails on each hand. I first painted the shape with a few different white polishes so the colours would pop, and the layered the orange, green and brown on top. I used MoYou Explorer Plate 21 for the leaves. 


Polishes used:
BK Matt White (stamping)
Ciate Snow Virgin & Finger Paints Hip Hip Hue-Ray (undies)
China Glaze Be More Pacific
OPI You Don't Know Jacques
L'oreal Orange You Jealous


I love the way the white stamping really pops over the purple base.


Hope you enjoy!

xo Shawna

Thursday, October 23, 2014

Halloween Colour Block Mani

Good evening ladies! It's been a hectic week getting back into the swing of things at home after vacation. So, this mani was actually painted on Tuesday night but I only just got around to photographing and blogging it (late!) tonight - hope you'll forgive me :) The nice thing about posted a worn-around-town mani is I've already gotten multiple compliments on the nail art so I'm feeling good about it!


I'm not much of a Halloween fan at all (as much as I love the amazing Halloween themed manis I've seen from other bloggers and instagrammers!). I've never been excited about dressing up. So, orange and black nails are about as Halloween as it gets for me! I've seen this nail art design quite a bit but most recently My Mint Nails posted a lovely pink variation, which inspired my recreation with some seasonally coloured polishes. At first I attempted using scotch tape for the lines but they still weren't perfect (see: wobbly black lines) so I just freehanded the silver. The next day I received my striping tape in the mail! This silver is stunning but its definitely a mess to clean up. The acetone was basically dissolving it so some of the black shows through. There's also some polish wear at the tips as this mani is a few days old- oops! It's actually wearing quite well considering I wear gloves and work with my hands, thanks to HK Girl Top Coat :)


Colours used:
Loreal Orange You Jealous?
Wet n' Wild Black Creme
Sally Hansen Hi-Ho Silver
HK Girl Top Coat


So- are you a Halloween fan or is it not a big deal for you?

xo Shawna

Tuesday, October 7, 2014

Thermal Explorer Stamped MoYou Mani

I haven't posted a stamped manicure lately, since I've been branching out and trying different hand-painted nail art lately. Tonight I swatched another shade from MTL, a green thermal polish. When deciding which plate to stamp with, I was drawn to the explorer collection again - I seem to connect these images to a green background!

My Nails Did: Thermal Polish + MoYou Stamping Mani

Green usually isn't a popular polish shade in my repertoire, but I loved the thermal combo, which turns a darker green shade when cold. At first I thought I was broken- it was taking a while to achieve the colour change and my other thermal polish is so subtle, I thought maybe my body chemistry just wasn't working for them. But lo and behold, after soaking my nails in a mini ice bath for 30 seconds, I saw it! Watch for these swatches in that upcoming post I promised. (Soon!) My fiancé is on night shifts which means I can stink up the condo to my hearts content :) 

My Nails Did: Thermal Polish + MoYou Stamping Mani

Polishes Used:
MTL Creations Sam the Shifter
Wet n Wild Black Creme
HK Girl Top Coat (not applied until after photos)
MoYou London Explorer 21

My Nails Did: Thermal Polish + MoYou Stamping Mani

I actually like my "Cinderella" hand more for this mani! I experimented with more variety in the pattern placement and really like how it turned out. I think the green & black make it a great Halloween colour combination!

My Nails Did: Thermal Polish + MoYou Stamping Mani

Do you have a colour family you generally just don't like in nail polish?

xo Shawna

Friday, September 19, 2014

Floral & Stripes - Nail Art Challenge Week 3

Today is week 3 of the #twinkienailartchallenge and the theme is floral. This was perfect because I've been wanting to create some floral nail designs but have been worried that I didn't know how and they wouldn't turn out! It was a great opportunity to be drawn out of my comfort zone. 

My Nails Did: Floral & Stripes Manicure

Browsing bloglovin for inspiration, I found a tutorial from wondrously polished on a pretty floral design. It was on a black base, however I wanted to use my new finger paints polish and keep it light and fresh for the last few days of summer. 

My Nails Did: Floral & Stripes Manicure

Polishes used:
Base
Finger Paints Natural Talent
Flowers
OPI - red mini
OPI Mod About You
Ciaté Snow Virgin
Loreal Safari Chic
China Glaze Tree Hugger
Toppers
China Glaze Fairy Dust
HK Girl Top Coat 

My Nails Did: Floral & Stripes Manicure


Initially I striped the index finger as well, but I didn't like it. The nude on it's own was a little plain so I jazzed it up with a red rhinestone from born pretty store (it's true red IRL, the photos made it look orange!) and a swipe of holo topper. I'm pretty pleased with the result of my first floral mani! 

Do you stick to tried and true designs or venture into new design territories often? 

xo Shawna 

post contains affiliate link

Sunday, September 7, 2014

Neon Tribal Inspired Nails

Happy Sunday everyone! Today I'm excited to share the fun manicure I created that has been in my mind for a while. Tribal (geometric) manicures are remaining a popular trend in the nail art world and I couldn't wait to jump on board. I bought black and white striping paints the other day and I decided I was ready to take on a whole manicure inspired by tribal prints!

For ideas, I googled "Tribal Print" and I had a few ideas already tucked away in my mind. My favourite nails are the design on my right thumb/ left middle finger, and the design on my left thumb/ right index finger!

Neon Pool Party Tribal Geometric Manicure

Neon Pool Party Tribal Geometric Manicure

To create this look, I used:
China Glaze Pool Party 
Finger Paints Hip-Hip-Hue-Ray!
Finger Paints Ch-Art-Coal Black
HK Girl Top Coat

Neon Pool Party Tribal Geometric Manicure

Neon Pool Party Tribal Geometric Manicure

Are you on board with the tribal trend? Which designs are your favourite?

xo Shawna

Friday, September 5, 2014

Twinkie Nail Art Challenge - Nude & Teal Floral Stamped Mani

I decided a few days too late that I would have liked to join the 31 day mani challenge. Luckily I stumbled upon another gem of a nail art challenge, which involves only one mani per week - definitely doable! 

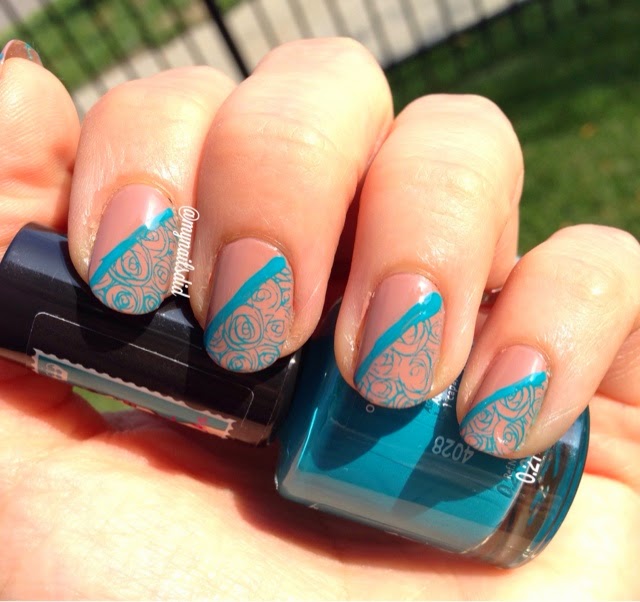
The #twinkienailartchallenge is hosted by @spilledmilknails and @polishedbybeckie on Instagram. The first theme of the month is a teal mani for ovarian cancer awareness. At first I had a different vision involving a dark on light lace stamped mani. The more I thought about it though, the more I decided it was high time to use my princess collection plate 09 from MoYou - the first pattern I fell in love with! 

Nude & Teal Rose Stamped Mani MoYou

I decided to pair the delicate rose pattern with a more neutral base, and settled on one of my favourite (ok, only) nudes which is OPI Barefoot in Barcelona. I just love it, it goes on smoothly with a gorgeous creme finish. Rimmel's Do Not Disturb provided the perfect pop of colour and proved to be a great stamping polish too! I'll have to grab more colours from that collection. 

Nude & Teal Rose Stamped Mani MoYou

Wanting to be a bit more creative than another full nail stamping mani, I used scotch tape to divide my nail in half on the diagonal. A great tip I found from a defunct blog (Chloe's Nails) suggested sticking the tape to the back of your hand a couple of times so it was less likely to wreck your base (which I let dry super well anyways!). After prepping the stamp, I applied the tape and stamped to minimize the amount of time the tape was on the nail, working one nail at a time. 

Nude & Teal Rose Stamped Mani MoYou

I used a liner brush to paint a thin line of the teal polish to make the pattern really stand out. Lastly, I finished with a coat of HK girl top coat. Voila! This was so fun and I am looking forward to the rest of the challenge for more inspiration! 


xo Shawna 

Saturday, August 30, 2014

My Nail Polish Organization

I was excited to be able to get out to Ikea today to pick up a Kallax insert for my Expedit shelf. (They recently changed the Expedit line to Kallax - It's slightly thinner and therefore uses less material = more eco conscious). I've been eyeing one since my polish collection started outgrowing my previous storage, shortly after I wrote the post on my polish stash!

Ikea nail polish storage KALLAX

It wasn't too difficult to put the unit together, although once I finished I realized I could have gotten use out of my fiancés power drill! Probably best I stayed away from the power tools, though - I'm definitely not handy. 

Ikea nail polish storage KALLAX

In the top drawer, I have all my nail art supplies. This consists of: my black & white polishes for stamping, my Ciate caviar beads, rhinestone wheel, nail wraps, nail decals, stamping plates & scrapers, brush set, dotting tool, orange wood cuticle pushers, feathers, files and a few other odds & ends. 

Ikea nail polish storage KALLAX

My polish drawer was loosely organized by colour. Base/ top coats and nail treatments in the back! 

There's a few other great storage solutions for polish from Ikea including the Helmer (the gold standard for polish collections, I think!) and the Alex. I would love a Helmer however there is just no where else to cram another storage unit in my condo! 

What's your storage look like? Do you organize by brand or by colour?

xo Shawna

Saturday, August 23, 2014

Simple Duochrome & Teal French Manicure

I found a bottle of Sally Hansen Lustre Shine in my dollar store yesterday for a steal of $2, so I grabbed it. It looked pretty in the bottle, with a base of gold and a green colour shift. 

sally hansen lustre shine plume

However, once I got it on the nails, the colour shift was practically nonexistent! The shade is "Plume". This swatch is two coats and you can see there is definite visible nail line.

duochrome & teal french manicure

So, this turned into the manicure I couldn't leave alone. First I added French tips in my new Rimmel "Do Not Disturb" teal. Then, I decided it was still too plain so I fully painted accent nails on each hand (ring finger on the left, index on the right). 

duochrome & teal french manicure

Lastly, this morning I still wanted more, so I added some Gold glitter top coat (Sally Beauty brand) and finally satisfied, finished off with HK Girl top coat! It's not my favourite manicure, but it has enough interest now for me to leave it alone for the rest of the weekend. 

Do you ever do a manicure you just can't leave alone? Do you wear it for a day or take it off immediately? 

xo Shawna

Wednesday, August 20, 2014

Blue Ombré Paris Stamped Mani

Yesterday, Shoppers Drug Mart had an amazing deal on Essie polish, which worked out to $4.50 a bottle in multiples of 2. So I grabbed 4 different shades - and since I bought them at two locations I didn't realize until after how similar they all are! You like what you like, right? They're gorgeous light blues, lavenders and teals. I'll have to do a swatch post soon!

I also managed to get my hands on a couple bottles of the original formula of Sally Hansen's "Pacific Blue". Being new to the nail art world, I've only just discovered this "holy grail" shade, and my first attempt at buying actually landed me the new formula. I didn't love the colour so I'll be returning the new versions. SDM's in Milton are a gold mine for the original, with 9 bottles between the two stores I visited - it doesn't seem like there are a whole lot of nail enthusiasts in Milton, or else they'd all be gone! 

On to today's mani. I used Essie "Lapiz of Luxury" as the base (one of my new shades) and sponged a gradient with "Pacific Blue". 

essie lapis of luxury nail polish

Lapiz of Luxury swatched. 

essie lapis of luxury & sally hansen pacific blue nail polish

I love the way the ombré effect looks with these two shades! 

blue ombre parisian MoYou mani

I used MoYou London Tourist plate 21, which has a definite Parisian theme. There are a ton of cute designs, so I chose one floral as the main design with two accent nails on each hand. 

blue ombre parisian MoYou mani

Clearly, getting my stamps straight is something I need a little practice with! I don't mind too much, in particular I think the Eiffel Tower looks cute on a jaunty angle!

blue ombre parisian MoYou mani

On my right hand, I love the little moustaches! 

Despite my lack of centering some of the images, I think this mani is my favourite so far. (Not that I have a whole lot to choose from!). I used Ciate "Snow Virgin" as the stamping colour, and of course topped it off with HK Girl Top Coat which is becoming a fast favourite.

Does your nail polish stash have all the colours of the rainbow, or do you tend to gravitate towards the same colour family?

xo Shawna

Sunday, August 17, 2014

green mani Sunday

Happy Sunday everyone!

There is a green theme going around the nail instagram feed today, to support depression awareness in light of the recent passing of Robin Williams. If you search the hashtag #fightforlightandlive, you'll find a whole bunch of IG'ers who have painted their nails green today!

As I posted a few days ago on Facebook, I hope the positive that comes from the tragic event of a few days ago is to bring awareness to depression. If you are depressed, or even just not feeling like yourself and can't quite pinpoint it, you can ALWAYS ask for help - whether it be a family member or friend, or reaching out for support to a support line. Find a list of all the Canadian hotlines here.

To lighten things up, on to today's mani!

I've combined safari green with a leafy stamp, for a very nature inspired look!

green leaves nature inspired stamping manicure

The base colour is L'Oreal "Safari Chic". This was my first time using this new (to me) polish, and I was really impressed with the coverage of just one coat (as pictured). 

green leaves nature inspired stamping manicure

The white is Ciate "Snow Virgin". This is my first time using it to stamp, and again I'm impressed with the coverage from the polish. 

green leaves nature inspired stamping manicure

Don't be fooled by the bottle in the pic, I actually used HK Girl Top Coat. I had just packed away all my polish supplies when I redid the pics, and this bottle is being donated to my sister so it was readily available for a photo op!

Also, I am really having issues getting crisp photos, so hopefully you get the point. 

There you have it. Hope you had a great weekend!

xo Shawna

 
Images by Freepik