Showing posts with label teal. Show all posts

Friday, May 29, 2015

Ocean Nimbus for TGIF

I was struggling to think of an idea for the final week of May's TGIF challenge, so when in doubt, Nimbus! I've done a few variations on this mani before in various colours. I whipped this one out super fast, so it's not exactly my best nimbus! I love the colour palette however.


Products Used
Daily Hues Nail Lacquer Amelie (base)
Sally Hansen Babe Blue
Sally Hansen Pacific Blue
Funky Fingers Bezerk Turq
essie Good to Go Topcoat


Only a few days left of vacation! I'm writing this post ahead of time, but its extremely likely I'm nursing a post-wedding bash hangover when this goes live. 


What's your go-to nail art?
xo Shawna

Friday, March 20, 2015

Watermarble & Glitterbombs

I went shopping across the border on Friday and picked up a few new polishes! I exercised some serious restraint and ended up with 3 new funky fingers shades, 2 Bonita colours, and an INM out the door top coat, which I've seen plenty of raves over. (Kmart had a ton of clearance options but they were all pretty similar to what I already have, or colours I didn't love- so I decided to put them back! I'm so proud of myself!) Upon arrival home I knew I had to get right into them - and what better way to do some water marble practice which I have been itching to do. 


Products Used
Sally Hansen Hi-Ho Silver
Funky Fingers Life's a Beach
Funky Fingers Bezerk Turq
Funky Fingers Sand and Stillettos
Sally Hansen Babe Blue
INM Out the Door


I love the colour palette- a perfect celebration of spring! And I'm happy to see my water marble skills are improving. Not perfect, by far, but these are the first marbles that came out relatively like I actually planned. Can anyone recommend a good tool to use for marbling? 


Hope you enjoy :)
xo Shawna

Friday, March 6, 2015

Turquoise Water Marble turquoise #TGIF challenge

Happy Friday! My go-to monthly nail art challenge has been disbanded, so I decided to create my own as a great way to knock some to-do manis off my list and start exploring new techniques and styles. I've dubbed it the #TGIFnailartchallenge, so you can search the hashtag on IG to see more! It'll still be weekly, on Fridays. Of course if you're playing along it doesn't have to be done on the Friday, so you can jump in whenever! Week one is a technique that has been on my list for quite a while: the turquoise water marble. I used this tutorial


Products Used
Rimmel Do Not Disturb
Wet n' Wild Black Creme
L'oreal Because You're Worth It
China Glaze Fast Forward
Cuter Cuticles Cutie Guard
Non-Aerosol Hair spray
A million q-tips!


While this was definitely a "messy-mess" (as I would say to my nephew), boy do I love this one! I found my hairspray was a bit finicky for the technique so I had lots of do overs and had to clean the water quite a bit. I liked that, unlike a traditional water marble, if I wasn't satisfied with the coverage I would just dip my nail back in and catch the tiny little floaty bits to get more on the nail. My Cindy hand actually looks better, I may end up posting a pic on IG so go follow me over there!. 


Have you tried this technique? 
xo Shawna

Friday, February 6, 2015

Candy Hearts Mani

I saw this stamping plate from Bundle Monster when I placed my order in December. I knew I had to have it for some Valentines nail art! I've seen these candy heart sayings stamped over solid nails, but I wanted to do something a little more creative. So I came up with a negative space half-moon sweetheart mani! (I don't know if there's a name for it that's less of a mouthful- I'm sure someone else has come up with this idea before, I just haven't seen it!) This also worked perfectly for this week's theme for the twinkie nail art challenge of "hearts". 


Products Used (thumb - pinky)
Essie Lapis of Luxury
OPI Panda-monium Pink
China Glaze For Audrey
Barry M Coconut
Deborah Lippmann Shoshanna
OPI Manicurist of Seville (stamping)
China Glaze Fast Forward
Bundle Monster 425


I love this mani! I think it's super fun and it turned out exactly like I envisioned. I love all the pastel colours and it works well with the almond nail shape! I just wish the letters stamped a little bit more solid. 


Are you rocking V-day nails?

xo Shawna


Monday, February 2, 2015

The Polished Bookworms - Big Little Lies Nail Art

I was excited to recently learn that one of the nail bloggers I follow had created a book club for nails art lovers - The Polished Bookworms.  I love reading, I love nail art - the perfect combination! The first month found us reading Big Little Lies by Liane Moriarty.  I really enjoyed the book, and when I realized it was set in a beachside Australian town, I was so excited - it brought back some memories of the 7 months I spent traveling around the country! So, when the time came for a mani inspired by the book I went full-on, beachy, seaside theme (albeit a day late. Oops!)


Products Used
OPI Barefoot in Barcelona
Nicole by OPI My Lifesaver
Sally Hansen Pacific Blue
Wet n Wild Black Creme
China Glaze Fast Forward Top Coat
Bundle Monster 503, 508


I created a gradient reminiscent of a beach with sand, ocean and sky. I chose a few images from the Sun Kissed bundle monster collection and stamped overtop. I haven't done a gradient in a while (pre- cutie guard! I ran out of my tester so luckily I just purchased a new one!) and clean-up was SO much easier. I'm glad I stamped overtop, though, because I clearly need more practice - still!


I absolutely love the beachy feel, which is completely the opposite of reality at the moment - there is currently a major snowstorm happening as I type!

Have you done nail art related to a book or movie?

xo Shawna

Sunday, November 23, 2014

Breakfast at Tiffanys for #nailartnov

Ok, so this one is a few days late but better late than never! I have been picturing doing something like this ever since I ordered the Audrey plate from Born Pretty. The #nailartnov theme Movies finally presented me the perfect opportunity. I used the technique to shrink your stamping image so I could fit the entire Audrey on my nail and it works like a charm :) Feel free to click on the image to see it up close! 


Products Used
China Glaze Snow
Nicole by OPI My Lifesaver
Wet n Wild Black Creme
HK Girl Top Coat
Stamping Plate QA38 from Born Pretty (SDPX31 to save 10% on reg. priced items!) 


I see what the fuss is all about for this white polish. I've being using the Ciate Snow Virgin that came with my caviar kit and this one seems a lot more crisp. Winner! 


Do you like Breakfast at Tiffanys?

xo Shawna


Monday, November 17, 2014

Watermarble Mani for Nail Art Nov

I've come down with a sinus cold and feel and sound awful, so I took Monday as a sick day from work. Since it was a decidedly lazy day, I chose to finally tackle one of my "to-do" manis which also was the day 16 prompt for nail art november (after briefly considering just skipping a few days that I've missed due to the wedding festivities!)


Products used:
Polish My Life Nude Lace
Ciate Snow Virgin
Essie Mint Candy Apple
Rimmel Do Not Disturb
Born Pretty Store Gemstones (SDPX31 saves 10%!)
HK Girl Top Coat


I love the colour palette so despite the designs lacking interest, I'm pretty happy with my first ever attempt at water marbling. Hopefully one day I will be making awesome flower designs with the technique :)


Have you tried this technique?

xo Shawna

Friday, October 10, 2014

Splatter Nails + Cuter Cuticles Review!

I've got a two-in-one post for you tonight! First I have a single shot of my nails for this week's twinkie nails art challenge, which was splatter. I have never done this nail art before and I had an awful time of it. First I could barely get any nail polish to get off the straw, and when it finally started working the polish would literally get everywhere (skin, paper underneath, etc) EXCEPT the nail. Finally a few blobs made it onto the nail so I called it a day. This one came off immediately which is a first for me - usually I'll wear a mani at least for one day!

My Nails Did: Splatter Twinkie Nail Art Manicure

Polishes used:
Polish my Life Nude Lace
Nicole by OPI My Lifesaver
Rimmel Do Not Disturb
HK Girl Top Coat

But onto the better half of this post... my Cuter Cuticles cuticle oil review! Sammy aka Canaildian_Girl (one of my instagram besties- I hope she doesn't think I'm weird for considering her a bestie for someone I've only every "met" through social media!) asked if I wanted to be a tester for her new cuticle oil line, Cuter Cuticles. Of course I was all over that, I may or may not have a slight addiction to cuticle care products...

My Nails Did: Cuter Cuticles Product Review
Don't mind the look of the labels... I got cat fur all over them!
I was sent a list to choose a few scents from, but they ALL sounded amazing so I asked for a surprise. I received them ridiculously quick. The oils come in a 5mL rollerball package, which I will admit I was not sure I would like for application as I had never tried them before. I was very pleasantly surprised with how easy the rollerball is to use, and can I say the scents I received (death by chocolate & coffee) are AH-mazing! The oil itself is also fantastic, it's not too greasy and absorbs well within a few minutes. 

There's a ton of amazing sounding scents to choose from, and Sammy says more are likely on the way! I'm including a list to tempt you all. Each oil is $4 and shipping is very reasonable!

Death by Chocolate
Chocolate Covered Strawberry
Cinnamon Sugar
Maple Kisses
Gingerbread Latte
Coffee Bean
Lavender
Lemon 
Unscented


Do you use cuticle care products regularly?

xo Shawna

Disclaimer: These products were provided for testing purposes. There was no expectation of any review as compensation, I am doing so because I truly enjoyed the product! 

Friday, September 5, 2014

Twinkie Nail Art Challenge - Nude & Teal Floral Stamped Mani

I decided a few days too late that I would have liked to join the 31 day mani challenge. Luckily I stumbled upon another gem of a nail art challenge, which involves only one mani per week - definitely doable! 

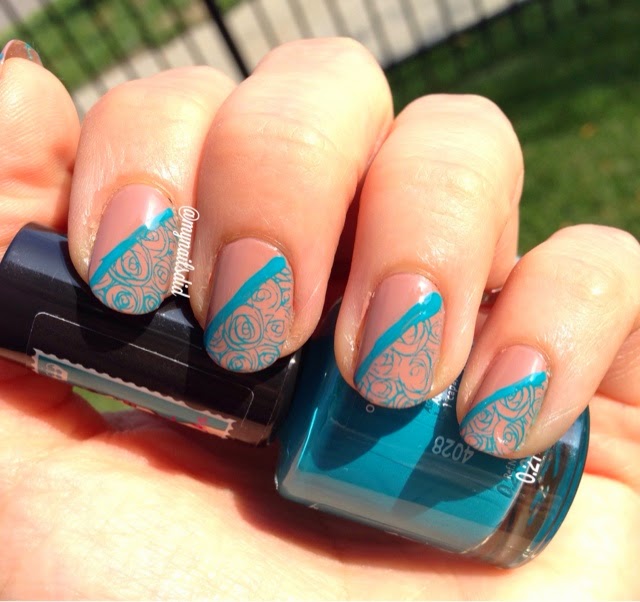
The #twinkienailartchallenge is hosted by @spilledmilknails and @polishedbybeckie on Instagram. The first theme of the month is a teal mani for ovarian cancer awareness. At first I had a different vision involving a dark on light lace stamped mani. The more I thought about it though, the more I decided it was high time to use my princess collection plate 09 from MoYou - the first pattern I fell in love with! 

Nude & Teal Rose Stamped Mani MoYou

I decided to pair the delicate rose pattern with a more neutral base, and settled on one of my favourite (ok, only) nudes which is OPI Barefoot in Barcelona. I just love it, it goes on smoothly with a gorgeous creme finish. Rimmel's Do Not Disturb provided the perfect pop of colour and proved to be a great stamping polish too! I'll have to grab more colours from that collection. 

Nude & Teal Rose Stamped Mani MoYou

Wanting to be a bit more creative than another full nail stamping mani, I used scotch tape to divide my nail in half on the diagonal. A great tip I found from a defunct blog (Chloe's Nails) suggested sticking the tape to the back of your hand a couple of times so it was less likely to wreck your base (which I let dry super well anyways!). After prepping the stamp, I applied the tape and stamped to minimize the amount of time the tape was on the nail, working one nail at a time. 

Nude & Teal Rose Stamped Mani MoYou

I used a liner brush to paint a thin line of the teal polish to make the pattern really stand out. Lastly, I finished with a coat of HK girl top coat. Voila! This was so fun and I am looking forward to the rest of the challenge for more inspiration! 


xo Shawna 

Saturday, August 23, 2014

Simple Duochrome & Teal French Manicure

I found a bottle of Sally Hansen Lustre Shine in my dollar store yesterday for a steal of $2, so I grabbed it. It looked pretty in the bottle, with a base of gold and a green colour shift. 

sally hansen lustre shine plume

However, once I got it on the nails, the colour shift was practically nonexistent! The shade is "Plume". This swatch is two coats and you can see there is definite visible nail line.

duochrome & teal french manicure

So, this turned into the manicure I couldn't leave alone. First I added French tips in my new Rimmel "Do Not Disturb" teal. Then, I decided it was still too plain so I fully painted accent nails on each hand (ring finger on the left, index on the right). 

duochrome & teal french manicure

Lastly, this morning I still wanted more, so I added some Gold glitter top coat (Sally Beauty brand) and finally satisfied, finished off with HK Girl top coat! It's not my favourite manicure, but it has enough interest now for me to leave it alone for the rest of the weekend. 

Do you ever do a manicure you just can't leave alone? Do you wear it for a day or take it off immediately? 

xo Shawna

 
Images by Freepik