Showing posts with label rimmel. Show all posts

Thursday, April 9, 2015

Yogini Mani + 100th Post!

Tonight's post is extra special! It marks my 100th post since starting this blog in August. That's a lot of posts- and a lot of manicures! Thanks to all of you who pop in to check out my nail art and comment from time to time. I appreciate you all!

My next few days will be spent at the Toronto Yoga Conference, 12 hours of yoga over the next two days! So I wanted to do a mani to fit the bill. Very appropriate for my 100th post as yoga is one of the other big parts of my life (I'm a hot yoga instructor part-time as well as my day job)!


Products Used
Polish My Life Nude Lace
OPI Barefoot in Barcelona
Rimmel Sage All The Rage
OPI Golden Waves
Nicole by OPI Hard-Kourt Kardashian
INM Out the Door Topcoat
MoYou London Explorer 27


I loved how easy the nimbus nail art from a few nights ago was, so I decided to use earth tones to create a neutral base for some stamping with my MoYou plate. Since the colours used are pretty delicate, they melded together amazingly to create a gorgeous watercolour effect base. I have to say, the Nicole polish was amazing for stamping with my creative stamper. I am so happy with the overall effect and will be proudly rocking these in downward dog!


In honour of my 100th post, I would love if you left a quick comment telling me what country you're reading from!

xo Shawna

Friday, March 6, 2015

Turquoise Water Marble turquoise #TGIF challenge

Happy Friday! My go-to monthly nail art challenge has been disbanded, so I decided to create my own as a great way to knock some to-do manis off my list and start exploring new techniques and styles. I've dubbed it the #TGIFnailartchallenge, so you can search the hashtag on IG to see more! It'll still be weekly, on Fridays. Of course if you're playing along it doesn't have to be done on the Friday, so you can jump in whenever! Week one is a technique that has been on my list for quite a while: the turquoise water marble. I used this tutorial. 


Products Used
Rimmel Do Not Disturb
Wet n' Wild Black Creme
L'oreal Because You're Worth It
China Glaze Fast Forward
Cuter Cuticles Cutie Guard
Non-Aerosol Hair spray
A million q-tips!


While this was definitely a "messy-mess" (as I would say to my nephew), boy do I love this one! I found my hairspray was a bit finicky for the technique so I had lots of do overs and had to clean the water quite a bit. I liked that, unlike a traditional water marble, if I wasn't satisfied with the coverage I would just dip my nail back in and catch the tiny little floaty bits to get more on the nail. My Cindy hand actually looks better, I may end up posting a pic on IG so go follow me over there!. 


Have you tried this technique? 
xo Shawna

Wednesday, March 4, 2015

Peacock Stamped Gradient

Happy Hump Day!
This mani is my first foray into gradient stamping. I'm kind of on the fence about it. I think next time I use this technique I will centre the division better colours on the nail better, and I will be happier!


Products Used
Ciate Spending Spree
CND Vinylux Rock Royalty
Rimmel Do Not Disturb
China Glaze Fast Forward
Born Pretty Plate BP 30 (SDPX31 for 10% off)


I do love the colours together, and think they work great for the peacock pattern! Can I tell you how awkward Ciate bottles are to pose with?


What do you think of the technique?
xo Shawna

Monday, November 17, 2014

Watermarble Mani for Nail Art Nov

I've come down with a sinus cold and feel and sound awful, so I took Monday as a sick day from work. Since it was a decidedly lazy day, I chose to finally tackle one of my "to-do" manis which also was the day 16 prompt for nail art november (after briefly considering just skipping a few days that I've missed due to the wedding festivities!)


Products used:
Polish My Life Nude Lace
Ciate Snow Virgin
Essie Mint Candy Apple
Rimmel Do Not Disturb
Born Pretty Store Gemstones (SDPX31 saves 10%!)
HK Girl Top Coat


I love the colour palette so despite the designs lacking interest, I'm pretty happy with my first ever attempt at water marbling. Hopefully one day I will be making awesome flower designs with the technique :)


Have you tried this technique?

xo Shawna

Friday, October 10, 2014

Splatter Nails + Cuter Cuticles Review!

I've got a two-in-one post for you tonight! First I have a single shot of my nails for this week's twinkie nails art challenge, which was splatter. I have never done this nail art before and I had an awful time of it. First I could barely get any nail polish to get off the straw, and when it finally started working the polish would literally get everywhere (skin, paper underneath, etc) EXCEPT the nail. Finally a few blobs made it onto the nail so I called it a day. This one came off immediately which is a first for me - usually I'll wear a mani at least for one day!

My Nails Did: Splatter Twinkie Nail Art Manicure

Polishes used:
Polish my Life Nude Lace
Nicole by OPI My Lifesaver
Rimmel Do Not Disturb
HK Girl Top Coat

But onto the better half of this post... my Cuter Cuticles cuticle oil review! Sammy aka Canaildian_Girl (one of my instagram besties- I hope she doesn't think I'm weird for considering her a bestie for someone I've only every "met" through social media!) asked if I wanted to be a tester for her new cuticle oil line, Cuter Cuticles. Of course I was all over that, I may or may not have a slight addiction to cuticle care products...

My Nails Did: Cuter Cuticles Product Review
Don't mind the look of the labels... I got cat fur all over them!
I was sent a list to choose a few scents from, but they ALL sounded amazing so I asked for a surprise. I received them ridiculously quick. The oils come in a 5mL rollerball package, which I will admit I was not sure I would like for application as I had never tried them before. I was very pleasantly surprised with how easy the rollerball is to use, and can I say the scents I received (death by chocolate & coffee) are AH-mazing! The oil itself is also fantastic, it's not too greasy and absorbs well within a few minutes. 

There's a ton of amazing sounding scents to choose from, and Sammy says more are likely on the way! I'm including a list to tempt you all. Each oil is $4 and shipping is very reasonable!

Death by Chocolate
Chocolate Covered Strawberry
Cinnamon Sugar
Maple Kisses
Gingerbread Latte
Coffee Bean
Lavender
Lemon 
Unscented


Do you use cuticle care products regularly?

xo Shawna

Disclaimer: These products were provided for testing purposes. There was no expectation of any review as compensation, I am doing so because I truly enjoyed the product! 

Friday, September 5, 2014

Twinkie Nail Art Challenge - Nude & Teal Floral Stamped Mani

I decided a few days too late that I would have liked to join the 31 day mani challenge. Luckily I stumbled upon another gem of a nail art challenge, which involves only one mani per week - definitely doable! 

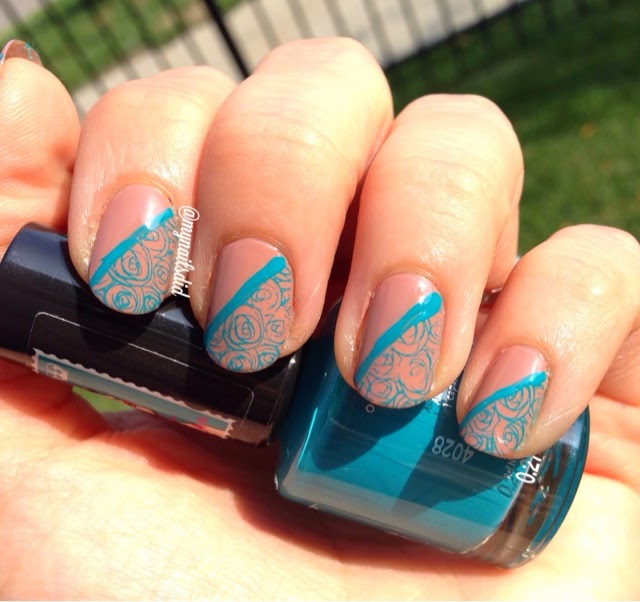
The #twinkienailartchallenge is hosted by @spilledmilknails and @polishedbybeckie on Instagram. The first theme of the month is a teal mani for ovarian cancer awareness. At first I had a different vision involving a dark on light lace stamped mani. The more I thought about it though, the more I decided it was high time to use my princess collection plate 09 from MoYou - the first pattern I fell in love with! 

Nude & Teal Rose Stamped Mani MoYou

I decided to pair the delicate rose pattern with a more neutral base, and settled on one of my favourite (ok, only) nudes which is OPI Barefoot in Barcelona. I just love it, it goes on smoothly with a gorgeous creme finish. Rimmel's Do Not Disturb provided the perfect pop of colour and proved to be a great stamping polish too! I'll have to grab more colours from that collection. 

Nude & Teal Rose Stamped Mani MoYou

Wanting to be a bit more creative than another full nail stamping mani, I used scotch tape to divide my nail in half on the diagonal. A great tip I found from a defunct blog (Chloe's Nails) suggested sticking the tape to the back of your hand a couple of times so it was less likely to wreck your base (which I let dry super well anyways!). After prepping the stamp, I applied the tape and stamped to minimize the amount of time the tape was on the nail, working one nail at a time. 

Nude & Teal Rose Stamped Mani MoYou

I used a liner brush to paint a thin line of the teal polish to make the pattern really stand out. Lastly, I finished with a coat of HK girl top coat. Voila! This was so fun and I am looking forward to the rest of the challenge for more inspiration! 


xo Shawna 

Saturday, August 30, 2014

My Nail Polish Organization

I was excited to be able to get out to Ikea today to pick up a Kallax insert for my Expedit shelf. (They recently changed the Expedit line to Kallax - It's slightly thinner and therefore uses less material = more eco conscious). I've been eyeing one since my polish collection started outgrowing my previous storage, shortly after I wrote the post on my polish stash!

Ikea nail polish storage KALLAX

It wasn't too difficult to put the unit together, although once I finished I realized I could have gotten use out of my fiancés power drill! Probably best I stayed away from the power tools, though - I'm definitely not handy. 

Ikea nail polish storage KALLAX

In the top drawer, I have all my nail art supplies. This consists of: my black & white polishes for stamping, my Ciate caviar beads, rhinestone wheel, nail wraps, nail decals, stamping plates & scrapers, brush set, dotting tool, orange wood cuticle pushers, feathers, files and a few other odds & ends. 

Ikea nail polish storage KALLAX

My polish drawer was loosely organized by colour. Base/ top coats and nail treatments in the back! 

There's a few other great storage solutions for polish from Ikea including the Helmer (the gold standard for polish collections, I think!) and the Alex. I would love a Helmer however there is just no where else to cram another storage unit in my condo! 

What's your storage look like? Do you organize by brand or by colour?

xo Shawna

Saturday, August 23, 2014

Simple Duochrome & Teal French Manicure

I found a bottle of Sally Hansen Lustre Shine in my dollar store yesterday for a steal of $2, so I grabbed it. It looked pretty in the bottle, with a base of gold and a green colour shift. 

sally hansen lustre shine plume

However, once I got it on the nails, the colour shift was practically nonexistent! The shade is "Plume". This swatch is two coats and you can see there is definite visible nail line.

duochrome & teal french manicure

So, this turned into the manicure I couldn't leave alone. First I added French tips in my new Rimmel "Do Not Disturb" teal. Then, I decided it was still too plain so I fully painted accent nails on each hand (ring finger on the left, index on the right). 

duochrome & teal french manicure

Lastly, this morning I still wanted more, so I added some Gold glitter top coat (Sally Beauty brand) and finally satisfied, finished off with HK Girl top coat! It's not my favourite manicure, but it has enough interest now for me to leave it alone for the rest of the weekend. 

Do you ever do a manicure you just can't leave alone? Do you wear it for a day or take it off immediately? 

xo Shawna

Friday, August 15, 2014

my nail polish stash

So I decided it would make sense to take stock of my collection to get a better idea of exactly what colours I have (and therefore, which I will need to round out the colour wheel for my nail art - I'm after grey and turquoise next!). Normally this storage bin just has all the bottles chucked in haphazardly, and things get buried at the bottom.. The other night I really wanted silver glitter and thought I didn't have any, but I found a mini bottle in there!


This is the whole collection, including 50 shades (that includes the glitters, etc), 7 base & top coats and nail treatments, one bottle of caviar, feathers, a set of nail wraps and my implements. I also have a bunch of nail decals in the mail from the born pretty store. 


A close up of all the colours. Mostly OPI & China Glaze, with a sprinkling of Color Club minis, L'Oreal, and a few random brands. 


These are my favourite shades in rotation. 


And all my nail treatments. My sister has just claimed my China Glaze top coat since she ran out, and I clearly have more than enough. 

What does your collection look like? Do you know how many colours you have?

xo
Shawna

(post contains affiliate link)

 
Images by Freepik