Showing posts with label twinkie nail art challenge. Show all posts

Friday, February 6, 2015

Candy Hearts Mani

I saw this stamping plate from Bundle Monster when I placed my order in December. I knew I had to have it for some Valentines nail art! I've seen these candy heart sayings stamped over solid nails, but I wanted to do something a little more creative. So I came up with a negative space half-moon sweetheart mani! (I don't know if there's a name for it that's less of a mouthful- I'm sure someone else has come up with this idea before, I just haven't seen it!) This also worked perfectly for this week's theme for the twinkie nail art challenge of "hearts". 


Products Used (thumb - pinky)
Essie Lapis of Luxury
OPI Panda-monium Pink
China Glaze For Audrey
Barry M Coconut
Deborah Lippmann Shoshanna
OPI Manicurist of Seville (stamping)
China Glaze Fast Forward
Bundle Monster 425


I love this mani! I think it's super fun and it turned out exactly like I envisioned. I love all the pastel colours and it works well with the almond nail shape! I just wish the letters stamped a little bit more solid. 


Are you rocking V-day nails?

xo Shawna


Friday, January 23, 2015

earthy ruffian nails

This week's theme for the twinkie nail art challenge was "earth tones". I actually don't really like most earth tones for myself (other people rock them, but not me!) so I decided to go for one of my favourite stormy blues (the sky is an earth tone, right?!) and layer it over a rich chocolate brown in an easy-to-do ruffian manicure. 


Products Used
Nicole by OPI Hard-Kourt Kardashian
Polish My Life Storm Clouds
China Glaze Fast Forward Top Coat


The ruffian technique was pretty easy to do, and didn't require any tools. I'll be doing this again in different colour combinations, I think it would look great with a metallic polish!


Are you a fan of earth tones? Either for polish or in your wardrobe?

xo Shawna

Friday, January 9, 2015

Black and White Forest

Happy Friday! Goodness am I glad it's the weekend. I only work about one 5 day work week a month, and of course in January it's the first week back after the holidays - boo hoo right? Anyways, I'm wiped! 

Today's manicure is for week 2 of the January twinkie nail art challenge - the theme being "black and white". The timing couldn't have been better - I got a bunch of stamping plates I ordered in yesterday's mail (both MoYou and Bundle Monster, which is a new-to-me brand). I had seen the gorgeous, ethereal tree design in my feed a few times and just had to have it. Black and white was a perfect palette for this stamping mani! I sandwiched the stamping with a few different glitters and this is the first manicure all week that I have kept on for longer than a day!


Products Used
China Glaze Snow
Sally Girl (unnamed) Silver Glitter
Wet n Wild Black Creme
China Glaze Fairy Dust
China Glaze Fast Forward
Bundle Monster 407


I hear that BM plates can be hit or miss with the quality, but this image stamped like a dream. (I also tested out a second plate, and it was slightly more finicky but I still got quite good transfers. It was the sugar skull design - notorious for people having issues with). 


Any plans for the weekend?

xo Shawna

Friday, January 2, 2015

Rainbow side frenchy

I decided to get back into the nail art challenges, although I like the weekly challenges as opposed to the ones that are every few days. So I'm back to the twinkie nail challenge! This fridays prompt was "rainbow". When I think rainbow I think skittles nails, but I didn't want it to be in your face. Enter the sideways french manicure! 


Products used 
China Glaze Tip Your Hat
China Glaze Ruby Pumps
L'oreal Orange You Jealous
China Glaze Tree Hugger 
Sally Hansen Pacific Blue
Nicole Pretty in Plum
Nicole Gumdrops Silver (unnamed mini) 
China Glaze Fast Forward


I love how the rainbow effect is subtle and the look changes depending which angle you're looking. I didn't even realize until after the fact (and after i top coated) that the gumdrops is a textured polish. That explains why it was so bumpy even after topcoat, lol! 


Hope you like! 

xo Shawna 

Friday, November 7, 2014

Blue Plaid for Nail Art November

I am I love with today's mani. If I could get a bottle of nail polish for every time I said that...
Today is a combo of two challenges, nail art November (the theme is "plaid") and the twinkie nails art challenge, which the theme is "colour chosen by significant other". I knew without asking (but asked anyways!) that my fiancé would choose blue, and sure enough he did. I had a lot of fun creating this look, and while it was simple enough, it was a tad time consuming! Good thing I had the night off. 


Colours used:
Ciatè Chinchilla (base)
China Glaze Up All Night
Sally Hansen Pacific Blue
Sally Hansen Hi-Ho Silver
Finger Paints Striper Hip Hip Hue-Ray
HK Girl Top Coat
Striping Brushes from eBay


I love the monochrome colour palette with the pops of white and silver. 
Please excuse the state of my cuticles, I did my clean-up in low lighting late last night and mistakenly thought I did a decent job. Oops!


Hope you love it!

xo Shawna

Friday, October 31, 2014

Pumpkins and Leaves - Twinkie Nail Art Challenge

As much as I liked Tuesday's mani, I was ready to pump it up with some more Halloween-themed nail art. The final Friday for October's theme for the Twinkie Nail Art Challenge is "Halloween/ Harvest" and I think this fits the bill! (I actually did this nail art Wednesday night, but saved the post to keep to the schedule :) I've seen a lot of pumpkin manicures that looked simple enough, so I choose a few accent nails on each hand. I first painted the shape with a few different white polishes so the colours would pop, and the layered the orange, green and brown on top. I used MoYou Explorer Plate 21 for the leaves. 


Polishes used:
BK Matt White (stamping)
Ciate Snow Virgin & Finger Paints Hip Hip Hue-Ray (undies)
China Glaze Be More Pacific
OPI You Don't Know Jacques
L'oreal Orange You Jealous


I love the way the white stamping really pops over the purple base.


Hope you enjoy!

xo Shawna

Friday, October 24, 2014

Jelly Sammich Mani - Twinkie Nail Art Challenge

Good afternoon! I'm excited to be back in the swing of the weekly Twinkie Nail art challenge :) This week is "Jelly Sammich"! And in other big nail news... I have a new nail shape, almond shorties! They feel really strange, especially as I type. I had my plain old oval nails for quite a while - I'm guessing more than a year! They're growing on me though.

I had just the polish in mind, which I specifically bought for this kind of mani - Pink Freud from Echoes Polish. This is a new-to-me technique and while I don't totally love how the stamping images I chose end up looking combined, I can see myself playing with the technique in the future with different designs. And maybe more chunky glitter!


Polishes used:
Echoes Polish Pink Freud
BK Matt White (use code SDPX31 for 10% off!)
MTL Creations Tara
Sally Girl Silver Glitter
Ciate Speed Pro Top Coat
HK Girl Top Coat


I used a few plates, MoYou London Pro Plate 04, and m66 and QA91 from born pretty store. (SDPX31 for 10% off!) I think next time I'll just layer floral prints instead of different images. They kind of got lost!


Have you tried a jelly sammich mani yet?

xo Shawna


Tuesday, October 21, 2014

Twinkie challenge: stalker twin mani

The theme for last week's twinkie nail art challenge was "stalker twin mani" - aka copying a mani design you loved by someone else! No staged lightbox photos for this post- this manicure was done while I was on vacation in Cuba :)


The design was inspired by a tutorial I found on instagram, by @nailsbylsm. I changed the colour theme but followed the general design. It was a lot more work than I thought! Don't look too closely and you won't see the sloppy striping work :) 


Colours used:
Color Club neon pink mini
Echoes Polish Life is a Caberet
Finger Paints Hip-Hip-Hue-Ray!
Seche Vite Top Coat


The nice thing about being on a beach holiday was that my nails didn't chip and I got a solid few days of wear after all the effort free handing this design! I've copied the tutorial for you below if you want to give it a shot! 


Would you try this intricate design?

xo Shawna
(p.s. - pardon the poor quality of the cell phone pics!)


Friday, October 10, 2014

Splatter Nails + Cuter Cuticles Review!

I've got a two-in-one post for you tonight! First I have a single shot of my nails for this week's twinkie nails art challenge, which was splatter. I have never done this nail art before and I had an awful time of it. First I could barely get any nail polish to get off the straw, and when it finally started working the polish would literally get everywhere (skin, paper underneath, etc) EXCEPT the nail. Finally a few blobs made it onto the nail so I called it a day. This one came off immediately which is a first for me - usually I'll wear a mani at least for one day!

My Nails Did: Splatter Twinkie Nail Art Manicure

Polishes used:
Polish my Life Nude Lace
Nicole by OPI My Lifesaver
Rimmel Do Not Disturb
HK Girl Top Coat

But onto the better half of this post... my Cuter Cuticles cuticle oil review! Sammy aka Canaildian_Girl (one of my instagram besties- I hope she doesn't think I'm weird for considering her a bestie for someone I've only every "met" through social media!) asked if I wanted to be a tester for her new cuticle oil line, Cuter Cuticles. Of course I was all over that, I may or may not have a slight addiction to cuticle care products...

My Nails Did: Cuter Cuticles Product Review
Don't mind the look of the labels... I got cat fur all over them!
I was sent a list to choose a few scents from, but they ALL sounded amazing so I asked for a surprise. I received them ridiculously quick. The oils come in a 5mL rollerball package, which I will admit I was not sure I would like for application as I had never tried them before. I was very pleasantly surprised with how easy the rollerball is to use, and can I say the scents I received (death by chocolate & coffee) are AH-mazing! The oil itself is also fantastic, it's not too greasy and absorbs well within a few minutes. 

There's a ton of amazing sounding scents to choose from, and Sammy says more are likely on the way! I'm including a list to tempt you all. Each oil is $4 and shipping is very reasonable!

Death by Chocolate
Chocolate Covered Strawberry
Cinnamon Sugar
Maple Kisses
Gingerbread Latte
Coffee Bean
Lavender
Lemon 
Unscented


Do you use cuticle care products regularly?

xo Shawna

Disclaimer: These products were provided for testing purposes. There was no expectation of any review as compensation, I am doing so because I truly enjoyed the product! 

Friday, October 3, 2014

Dots - October Nail Art Challenge

Hello lovely readers! Happy Friday, it's time for another edition of the twinkie nail art challenge! October looks like a great month, with a few new techniques and fun manicures planned. 

Today (the first Friday of October- where did the time go?!) brings us the theme "dots". I've had this base on since Wednesday night, it's one of the polishes rom my first indie polish that I mentioned in my blog post last Saturday, from My True Love Creations. I'm still planning a swatch post for that haul, so stay tuned! (I have to wait until I'm home alone... I've been getting complaints about the fumes of my constant nail painting from my fiancé!)

My Nails Did: Dots Nail Art Challenge

I decided to keep it simple and go for a french manicure inspired dotticure. I wasn't intending to have the dots shrink in size towards the edges, but it just kind of happened - and i liked it! This look was super quick and easy - a great way to add some interest with minimal effort. The dotting took just 6 minutes (not that I timed it or anything :-p) 

My Nails Did: Dots Nail Art Challenge

Polished Used:
MTL Creations Mia
Ciate Snow Virgin
HK Girl Top Coat
Born Pretty Store Dotting Tool (use coupon SDPX31 to save 10%!)

My Nails Did: Dots Nail Art Challenge

My Nails Did: Twinkie Nail Art Challenge


What do you think of this take on a french mani?

xo Shawna


Friday, September 26, 2014

Dry Brush Mani - Twinkie Nail Art Challenge

Today is the last day of the September twinkie nail art challenge, and it brings us dry brushing!

This is a new-to-me technique, but pretty straight forward. I used this simple tutorial, only modifying to add both horizontal and vertical stripes.

My Nails Did: Dry brush mani

Polishes used:
Echoes Polish Barely There (base)
OPI Manicurist of Seville
OPI You Don't Know Jacques
OPI Love.Angel.Music.Baby
Rimmel Do Not Disturb
Ciate Speed Pro Top Coat

My Nails Did: Dry brush mani

I have mixed feelings about this mani. It's the reverse of what usually happens - I think it looks better in the picture than in real life! I will definitely try again with different colour combinations, perhaps a more monochromatic look would look better.

What do you think of this one?

xo Shawna

Friday, September 19, 2014

Floral & Stripes - Nail Art Challenge Week 3

Today is week 3 of the #twinkienailartchallenge and the theme is floral. This was perfect because I've been wanting to create some floral nail designs but have been worried that I didn't know how and they wouldn't turn out! It was a great opportunity to be drawn out of my comfort zone. 

My Nails Did: Floral & Stripes Manicure

Browsing bloglovin for inspiration, I found a tutorial from wondrously polished on a pretty floral design. It was on a black base, however I wanted to use my new finger paints polish and keep it light and fresh for the last few days of summer. 

My Nails Did: Floral & Stripes Manicure

Polishes used:
Base
Finger Paints Natural Talent
Flowers
OPI - red mini
OPI Mod About You
Ciaté Snow Virgin
Loreal Safari Chic
China Glaze Tree Hugger
Toppers
China Glaze Fairy Dust
HK Girl Top Coat 

My Nails Did: Floral & Stripes Manicure


Initially I striped the index finger as well, but I didn't like it. The nude on it's own was a little plain so I jazzed it up with a red rhinestone from born pretty store (it's true red IRL, the photos made it look orange!) and a swipe of holo topper. I'm pretty pleased with the result of my first floral mani! 

Do you stick to tried and true designs or venture into new design territories often? 

xo Shawna 

post contains affiliate link

Friday, September 12, 2014

Saran Wrap & Chevron Mani

Today marks week two of the #twinkienailartchallenge. The theme was Saran Wrap mani, which is something I've never tried before - and I was pleasantly surprised with how easy it was! I had also received my nail decals from Up Your Nail and was excited to try out the large chevrons. Her prices are great so check them out if you're after some decals. 

I started with a base of Lilacism and wasn't too sure where to go from there. I decided on a soft and sparkly look with pastel pink and gold. 

My Nails Did: Saran Wrap & Chevron Mani

The polishes used:
Essie Lilacism
OPI Mod About You
Loreal Because You're Worth It (saran wrap)
OPI Love.Angel.Music.Baby (accent tips)
Ciate Fast Dry Top Coat
China Glaze Matte Magic

My Nails Did: Saran Wrap & Chevron Mani

My Nails Did: Saran Wrap & Chevron Mani

My Nails Did: Saran Wrap & Chevron Mani

What do you think of the saran wrap look?

xo Shawna

Nothing to disclose

Friday, September 5, 2014

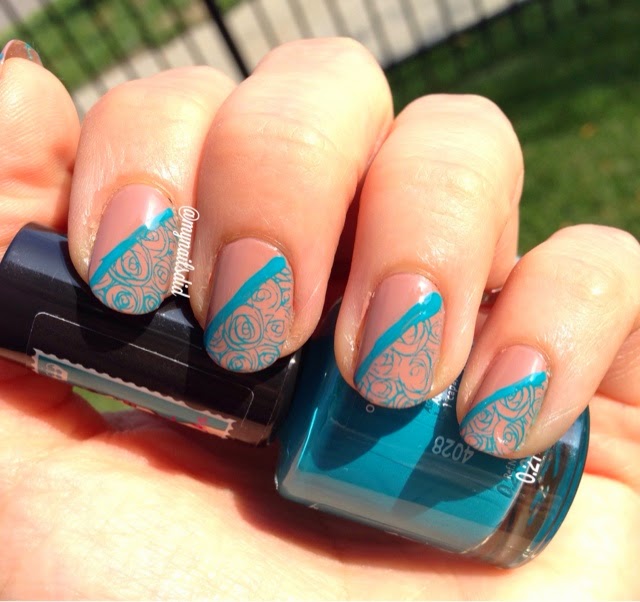
Twinkie Nail Art Challenge - Nude & Teal Floral Stamped Mani

I decided a few days too late that I would have liked to join the 31 day mani challenge. Luckily I stumbled upon another gem of a nail art challenge, which involves only one mani per week - definitely doable! 

The #twinkienailartchallenge is hosted by @spilledmilknails and @polishedbybeckie on Instagram. The first theme of the month is a teal mani for ovarian cancer awareness. At first I had a different vision involving a dark on light lace stamped mani. The more I thought about it though, the more I decided it was high time to use my princess collection plate 09 from MoYou - the first pattern I fell in love with! 

Nude & Teal Rose Stamped Mani MoYou

I decided to pair the delicate rose pattern with a more neutral base, and settled on one of my favourite (ok, only) nudes which is OPI Barefoot in Barcelona. I just love it, it goes on smoothly with a gorgeous creme finish. Rimmel's Do Not Disturb provided the perfect pop of colour and proved to be a great stamping polish too! I'll have to grab more colours from that collection. 

Nude & Teal Rose Stamped Mani MoYou

Wanting to be a bit more creative than another full nail stamping mani, I used scotch tape to divide my nail in half on the diagonal. A great tip I found from a defunct blog (Chloe's Nails) suggested sticking the tape to the back of your hand a couple of times so it was less likely to wreck your base (which I let dry super well anyways!). After prepping the stamp, I applied the tape and stamped to minimize the amount of time the tape was on the nail, working one nail at a time. 

Nude & Teal Rose Stamped Mani MoYou

I used a liner brush to paint a thin line of the teal polish to make the pattern really stand out. Lastly, I finished with a coat of HK girl top coat. Voila! This was so fun and I am looking forward to the rest of the challenge for more inspiration! 


xo Shawna 

 
Images by Freepik